javascript
- typescript, superset of javascript .
- nodejs, javascript runtime.
Introduction
浏览器执行JS
浏览器分成两部分:
- 渲染引擎:用来解析HTML与CSS,俗称内核, 比如Chrome的blink, 老版本的webkit
- JS引擎:也称为JS解释器 用来读取网页中的JavaScript代码,对其处理后运行,比如Chrome的V8
浏览器本身并不会执行JS代码,而是通过内置JavaScript引擎(解释器)来执行
JS引擎执行代码时逐行解释每一句源码(转换为机器语言)然后由计算机执行
JS的组成
-
ECMAScript
- ECMAScript是由ECMA国际(原欧洲计算机制造商协会)进行标准化的一门编程语言,这种语言在万维网上应用广泛,它往往被称为JavaScript或JScript,但实际上后两者是ECMAScript语言的实现和扩展
-
DOM 文档对象模型
-
BOM 浏览器对象模型
JavaScript Fundamentals
三种使用方式
-
行内式
- 可以将单行或少量JS代码写在HTML标签的事件属性中(以on开头的属性),如:onclick
- 注意单双引号的使用:在HTML中推荐使用双引号,JS中推荐使用单引号
- 可读性差,在html中编写JS大量代码时,不方便阅读:
- 引号易错,引号多层嵌套匹配时,非常容易弄混;
- 特殊情况下使用
-
内部引入
- 在HTML文件里面的某个地方添加一个<script>标签,然后在这个<script>标签内部书写JS代码
-
外部引入
- 利于HTML页面代码结构化,把大段JS代码独立到HTML页面之外,既美观,也方便文件级别的复用
- 引用外部JS文件的script标签中间不可以写代码
- 适合于JS代码量比较大的情况
<!DOCTYPE html>
<html lang="en">

<head>
    <meta charset="UTF-8">
    <meta name="viewport" content="width=device-width, initial-scale=1.0">
    <title>js三种引入</title>
    <!-- 3.外联js -->
    <script src="js/js.js"></script>
    <script>
        // 2.内嵌js
        alert("Hello,World")
    </script>
</head>

<body>
    <!-- js嵌入页面引入方式 -->
    <!-- 1.行间js(主要用于事件) -->
    <input type="button" value="点击一下" onclick="alert('HelloWorld')">

</body>

</html>
JS中输入输出语句
-
alert()
- 浏览器弹出警示框
- 浏览器控制打印输出信息
-
console.log()
Promise, async/await
callbacks
Introduction
Many functions are provided by JavaScript host environments that allow you to schedule asynchronous actions. In other words, actions that we initiate now, but they finish later.
For instance, one such function is the setTimeout function.
There are other real-world examples of asynchronous actions, e.g. loading scripts and modules
Take a look at the functionloadScript(src), that loads a script with the given src:
function loadScript(src) {
  // creates a <script> tag and append it to the page
  // this causes the script with given src to start loading and run when complete
  let script = document.createElement('script');
  script.src = src;
  document.head.append(script);
}
It inserts into the document a new, dynamically created, tag <script src="…"> with the given src. The browser automatically starts loading it and executes when complete.
We can use this function like this:
// load and execute the script at the given path
loadScript('/my/script.js');
The script is executed “asynchronously”, as it starts loading now, but runs later, when the function has already finished.
If there’s any code below loadScript(…), it doesn’t wait until the script loading finishes.
loadScript('/my/script.js');
// the code below loadScript
// doesn't wait for the script loading to finish
// ...
Let’s say we need to use the new script as soon as it loads. It declares new functions, and we want to run them.
But if we do that immediately after the loadScript(…) call, that wouldn’t work:
loadScript('/my/script.js'); // the script has "function newFunction() {…}"

newFunction(); // no such function!
Naturally, the browser probably didn’t have time to load the script. As of now, the loadScript function doesn’t provide a way to track the load completion. The script loads and eventually runs, that’s all. But we’d like to know when it happens, to use new functions and variables from that script.
Let’s add a callback function as a second argument to loadScript that should execute when the script loads:
function loadScript(src, callback) {
  let script = document.createElement('script');
  script.src = src;

  script.onload = () => callback(script);

  document.head.append(script);
}
The onload event is described in the article Resource loading: onload and onerror, it basically executes a function after the script is loaded and executed.
Now if we want to call new functions from the script, we should write that in the callback:
loadScript('/my/script.js', function() {
  // the callback runs after the script is loaded
  newFunction(); // so now it works
  ...
});
That’s the idea: the second argument is a function (usually anonymous) that runs when the action is completed.
Here’s a runnable example with a real script:
function loadScript(src, callback) {
  let script = document.createElement('script');
  script.src = src;
  script.onload = () => callback(script);
  document.head.append(script);
}

loadScript('https://cdnjs.cloudflare.com/ajax/libs/lodash.js/3.2.0/lodash.js', script => {
  alert(`Cool, the script ${script.src} is loaded`);
  alert( _ ); // _ is a function declared in the loaded script
});
That’s called a “callback-based” style of asynchronous programming. A function that does something asynchronously should provide a callback argument where we put the function to run after it’s complete.
Here we did it in loadScript, but of course it’s a general approach.
Callback in callback
How can we load two scripts sequentially: the first one, and then the second one after it?
The natural solution would be to put the second loadScript call inside the callback, like this:
loadScript('/my/script.js', function(script) {

  alert(`Cool, the ${script.src} is loaded, let's load one more`);

  loadScript('/my/script2.js', function(script) {
    alert(`Cool, the second script is loaded`);
  });

});
After the outer loadScript is complete, the callback initiates the inner one.
What if we want one more script…?
loadScript('/my/script.js', function(script) {

  loadScript('/my/script2.js', function(script) {

    loadScript('/my/script3.js', function(script) {
      // ...continue after all scripts are loaded
    });

  });

});
So, every new action is inside a callback. That’s fine for few actions, but not good for many, so we’ll see other variants soon.
Handling errors
In the above examples we didn’t consider errors. What if the script loading fails? Our callback should be able to react on that.
Here’s an improved version of loadScript that tracks loading errors:
function loadScript(src, callback) {
  let script = document.createElement('script');
  script.src = src;

  script.onload = () => callback(null, script);
  script.onerror = () => callback(new Error(`Script load error for ${src}`));

  document.head.append(script);
}
It calls callback(null, script) for successful load and callback(error) otherwise.
The usage:
loadScript('/my/script.js', function(error, script) {
  if (error) {
    // handle error
  } else {
    // script loaded successfully
  }
});
Once again, the recipe that we used for loadScript is actually quite common. It’s called the “error-first callback” style.
The convention is:
- The first argument of the callback is reserved for an error if it occurs. Then callback(err) is called.
- The second argument (and the next ones if needed) are for the successful result. Then callback(null, result1, result2…) is called.
So the single callback function is used both for reporting errors and passing back results.
Pyramid of Doom
At first glance, it looks like a viable approach to asynchronous coding. And indeed it is. For one or maybe two nested calls it looks fine.
But for multiple asynchronous actions that follow one after another, we’ll have code like this:
loadScript('1.js', function(error, script) {
  if (error) {
    handleError(error);
  } else {
    // ...
    loadScript('2.js', function(error, script) {
      if (error) {
        handleError(error);
      } else {
        // ...
        loadScript('3.js', function(error, script) {
          if (error) {
            handleError(error);
          } else {
            // ...continue after all scripts are loaded (*)
          }
        });

      }
    });
  }
});
In the code above:
We load 1.js, then if there’s no error…
We load 2.js, then if there’s no error…
We load 3.js, then if there’s no error – do something else(*).
As calls become more nested, the code becomes deeper and increasingly more difficult to manage, especially if we have real code instead of ... that may include more loops, conditional statements and so on.
That’s sometimes called “callback hell” or “pyramid of doom.”
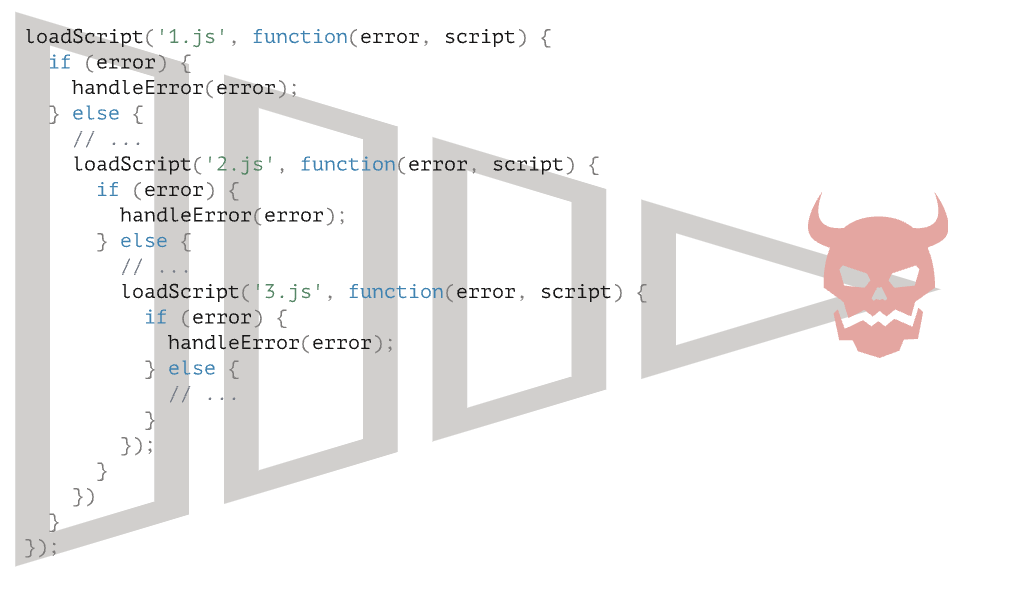
The “pyramid” of nested calls grows to the right with every asynchronous action. Soon it spirals out of control.
So this way of coding isn’t very good.
We can try to alleviate the problem by making every action a standalone function, like this:
loadScript('1.js', step1);

function step1(error, script) {
  if (error) {
    handleError(error);
  } else {
    // ...
    loadScript('2.js', step2);
  }
}

function step2(error, script) {
  if (error) {
    handleError(error);
  } else {
    // ...
    loadScript('3.js', step3);
  }
}

function step3(error, script) {
  if (error) {
    handleError(error);
  } else {
    // ...continue after all scripts are loaded (*)
  }
}
See? It does the same thing, and there’s no deep nesting now because we made every action a separate top-level function.
It works, but the code looks like a torn apart spreadsheet. It’s difficult to read, and you probably noticed that one needs to eye-jump between pieces while reading it. That’s inconvenient, especially if the reader is not familiar with the code and doesn’t know where to eye-jump.
Also, the functions named step are all of single use, they are created only to avoid the “pyramid of doom.”* No one is going to reuse them outside of the action chain. So there’s a bit of namespace cluttering here.
We’d like to have something better.
Luckily, there are other ways to avoid such pyramids. One of the best ways is to use “promises”, described in the next part.
Promise
Imagine that you’re a top singer, and fans ask day and night for your upcoming song.
To get some relief, you promise to send it to them when it’s published. You give your fans a list. They can fill in their email addresses, so that when the song becomes available, all subscribed parties instantly receive it. And even if something goes very wrong, say, a fire in the studio, so that you can’t publish the song, they will still be notified.
Everyone is happy: you, because the people don’t crowd you anymore, and fans, because they won’t miss the song.
This is a real-life analogy for things we often have in programming:
A “producing code” that does something and takes time. For instance, some code that loads the data over a network. That’s a “singer”.
A “consuming code” that wants the result of the “producing code” once it’s ready. Many functions may need that result. These are the “fans”.
A promise is a special JavaScript object that links the “producing code” and the “consuming code” together. In terms of our analogy: this is the “subscription list”. The “producing code” takes whatever time it needs to produce the promised result, and the “promise” makes that result available to all of the subscribed code when it’s ready.
The analogy isn’t terribly accurate, because JavaScript promises are more complex than a simple subscription list: they have additional features and limitations. But it’s fine to begin with.
The constructor syntax for a promise object is:
let promise = new Promise(function(resolve, reject) {
  // executor (the producing code, "singer")
});
The function passed to new Promise is called the executor. When new Promise is created, the executor runs automatically. It contains the producing code which should eventually produce the result. In terms of the analogy above: the executor is the “singer”.
Its arguments resolve and reject are callbacks provided by JavaScript itself. Our code is only inside the executor.
When the executor obtains the result, be it soon or late, doesn’t matter, it should call one of these callbacks:
- resolve(value) — if the job is finished successfully, with result value.
- reject(error) — if an error has occurred, error is the error object.
So to summarize: the executor runs automatically and attempts to perform a job. When it is finished with the attempt, it calls resolve if it was successful or reject if there was an error.
The promise object returned by the new Promise constructor has these internal properties:
state— initially "pending", then changes to either "fulfilled" when resolve is called or "rejected" when reject is called.result— initiallyundefined, then changes tovaluewhenresolve(value)is called orerrorwhenreject(error)is called.
So the executor eventually moves promise to one of these states:
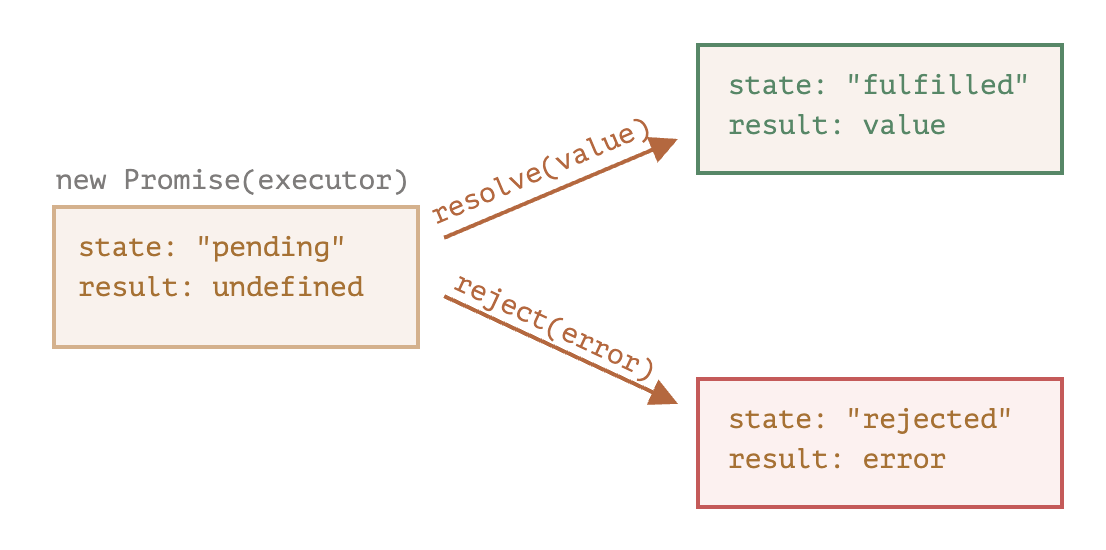
Later we’ll see how “fans” can subscribe to these changes.
Here’s an example of a promise constructor and a simple executor function with “producing code” that takes time (via setTimeout):
let promise = new Promise(function(resolve, reject) {
  // the function is executed automatically when the promise is constructed

  // after 1 second signal that the job is done with the result "done"
  setTimeout(() => resolve("done"), 1000);
});
We can see two things by running the code above:
-
The executor is called automatically and immediately (by
new Promise). -
The executor receives two arguments:
resolveandreject. These functions are pre-defined by the JavaScript engine, so we don’t need to create them. We should only call one of them when ready.
After one second of “processing”, the executor calls resolve("done") to produce the result. This changes the state of the promise object:

That was an example of a successful job completion, a “fulfilled promise”.
And now an example of the executor rejecting the promise with an error:
let promise = new Promise(function(resolve, reject) {
  // after 1 second signal that the job is finished with an error
  setTimeout(() => reject(new Error("Whoops!")), 1000);
});
The call to reject(...) moves the promise object to "rejected" state:
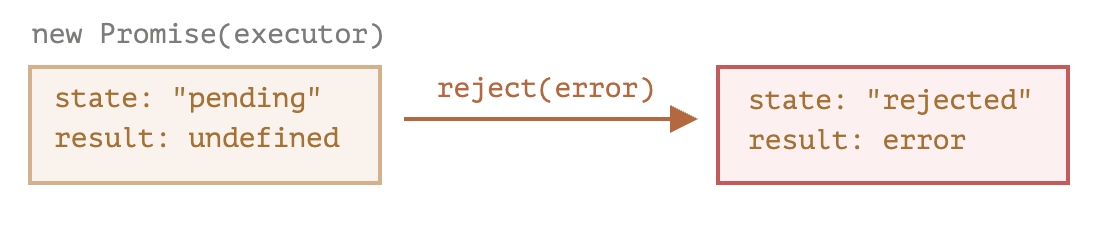
To summarize, the executor should perform a job (usually something that takes time) and then call resolve or reject to change the state of the corresponding promise object.
A promise that is either resolved or rejected is called “settled”, as opposed to an initially “pending” promise.
There can be only a single result or an error
The executor should call only one resolve or one reject. Any state change is final.
All further calls of resolve and reject are ignored:
let promise = new Promise(function(resolve, reject) {
  resolve("done");

  reject(new Error("…")); // ignored
  setTimeout(() => resolve("…")); // ignored
});
The idea is that a job done by the executor may have only one result or an error.
Also, resolve/reject expect only one argument (or none) and will ignore additional arguments.
Reject with Error objects
In case something goes wrong, the executor should call reject. That can be done with any type of argument (just like resolve). But it is recommended to use Error objects (or objects that inherit from Error). The reasoning for that will soon become apparent.
Immediately calling resolve/reject
In practice, an executor usually does something asynchronously and calls resolve/reject after some time, but it doesn’t have to. We also can call resolveor reject immediately, like this:
let promise = new Promise(function(resolve, reject) {
  // not taking our time to do the job
  resolve(123); // immediately give the result: 123
});
For instance, this might happen when we start to do a job but then see that everything has already been completed and cached.
That’s fine. We immediately have a resolved promise.
The state and result are internal
The properties state and result of the Promise object are internal. We can’t directly access them. We can use the methods .then/.catch/.finally for that. They are described below.
Consumers: then, catch
A Promise object serves as a link between the executor (the “producing code” or “singer”) and the consuming functions (the “fans”), which will receive the result or error. Consuming functions can be registered (subscribed) using the methods .then and .catch.
then
The most important, fundamental one is .then.
The syntax is:
promise.then(
  function(result) { /* handle a successful result */ },
  function(error) { /* handle an error */ }
);
The first argument of .then is a function that runs when the promise is resolved and receives the result.
The second argument of .then is a function that runs when the promise is rejected and receives the error.
For instance, here’s a reaction to a successfully resolved promise:
let promise = new Promise(function(resolve, reject) {
  setTimeout(() => resolve("done!"), 1000);
});

// resolve runs the first function in .then
promise.then(
  result => alert(result), // shows "done!" after 1 second
  error => alert(error) // doesn't run
);
The first function was executed.
And in the case of a rejection, the second one:
let promise = new Promise(function(resolve, reject) {
  setTimeout(() => reject(new Error("Whoops!")), 1000);
});

// reject runs the second function in .then
promise.then(
  result => alert(result), // doesn't run
  error => alert(error) // shows "Error: Whoops!" after 1 second
);
If we’re interested only in successful completions, then we can provide only one function argument to .then:
let promise = new Promise(resolve => {
  setTimeout(() => resolve("done!"), 1000);
});

promise.then(alert); // shows "done!" after 1 second
catch
If we’re interested only in errors, then we can use null as the first argument: .then(null, errorHandlingFunction). Or we can use .catch(errorHandlingFunction), which is exactly the same:
let promise = new Promise((resolve, reject) => {
  setTimeout(() => reject(new Error("Whoops!")), 1000);
});

// .catch(f) is the same as promise.then(null, f)
promise.catch(alert); // shows "Error: Whoops!" after 1 second
The call .catch(f) is a complete analog of .then(null, f), it’s just a shorthand.
Cleanup: finally
Just like there’s a finally clause in a regular try {...} catch {...}, there’s finally in promises.
The call.finally(f) is similar to .then(f, f) in the sense that f runs always, when the promise is settled: be it resolve or reject.
The idea of finally is to set up a handler for performing cleanup/finalizing after the previous operations are complete.
E.g. stopping loading indicators, closing no longer needed connections, etc.
Think of it as a party finisher. No matter was a party good or bad, how many friends were in it, we still need (or at least should) do a cleanup after it.
The code may look like this:
new Promise((resolve, reject) => {
  /* do something that takes time, and then call resolve or maybe reject */
})
  // runs when the promise is settled, doesn't matter successfully or not
  .finally(() => stop loading indicator)
  // so the loading indicator is always stopped before we go on
  .then(result => show result, err => show error)
Please note that finally(f) isn’t exactly an alias of then(f,f) though.
There are important differences:
-
A
finallyhandler has no arguments. Infinallywe don’t know whether the promise is successful or not. That’s all right, as our task is usually to perform “general” finalizing procedures.Please take a look at the example above: as you can see, the finally handler has no arguments, and the promise outcome is handled by the next handler.
-
A
finallyhandler “passes through” the result or error to the next suitable handler.
For instance, here the result is passed through finally to then:
new Promise((resolve, reject) => {
  setTimeout(() => resolve("value"), 2000);
})
  .finally(() => alert("Promise ready")) // triggers first
  .then(result => alert(result)); // <-- .then shows "value"
As you can see, the value returned by the first promise is passed through finally to the next then.
That’s very convenient, because finallyis not meant to process a promise result. As said, it’s a place to do generic cleanup, no matter what the outcome was.
And here’s an example of an error, for us to see how it’s passed through finally to catch:
new Promise((resolve, reject) => {
  throw new Error("error");
})
  .finally(() => alert("Promise ready")) // triggers first
  .catch(err => alert(err));  // <-- .catch shows the error
A finally handler also shouldn’t return anything. If it does, the returned value is silently ignored.
The only exception to this rule is when a finally handler throws an error. Then this error goes to the next handler, instead of any previous outcome.
To summarize:
- A
finallyhandler doesn’t get the outcome of the previous handler (it has no arguments). This outcome is passed through instead, to the next suitable handler. - If a
finallyhandler returns something, it’s ignored. - When
finallythrows an error, then the execution goes to the nearest error handler.
These features are helpful and make things work just the right way if we use finally how it’s supposed to be used: for generic cleanup procedures.
We can attach handlers to settled promises
If a promise is pending, .then/catch/finally handlers wait for its outcome.
Sometimes, it might be that a promise is already settled when we add a handler to it.
In such case, these handlers just run immediately:
// the promise becomes resolved immediately upon creation
let promise = new Promise(resolve => resolve("done!"));

promise.then(alert); // done! (shows up right now)
Note that this makes promises more powerful than the real life “subscription list” scenario. If the singer has already released their song and then a person signs up on the subscription list, they probably won’t receive that song. Subscriptions in real life must be done prior to the event.
Promises are more flexible. We can add handlers any time: if the result is already there, they just execute.
Example: loadScript
Next, let’s see more practical examples of how promises can help us write asynchronous code.
We’ve got the `loadScript function for loading a script from the previous chapter.
Here’s the callback-based variant, just to remind us of it:
function loadScript(src, callback) {
  let script = document.createElement('script');
  script.src = src;

  script.onload = () => callback(null, script);
  script.onerror = () => callback(new Error(`Script load error for ${src}`));

  document.head.append(script);
}
Let’s rewrite it using Promises.
The new function loadScript will not require a callback. Instead, it will create and return a Promise object that resolves when the loading is complete. The outer code can add handlers (subscribing functions) to it using .then:
function loadScript(src) {
  return new Promise(function(resolve, reject) {
    let script = document.createElement('script');
    script.src = src;

    script.onload = () => resolve(script);
    script.onerror = () => reject(new Error(`Script load error for ${src}`));

    document.head.append(script);
  });
}
Usage:
let promise = loadScript("https://cdnjs.cloudflare.com/ajax/libs/lodash.js/4.17.11/lodash.js");

promise.then(
  script => alert(`${script.src} is loaded!`),
  error => alert(`Error: ${error.message}`)
);

promise.then(script => alert('Another handler...'));
We can immediately see a few benefits over the callback-based pattern:
| Promises | Callbacks |
|---|---|
Promises allow us to do things in the natural order. First, we run loadScript(script), and .then we write what to do with the result. |
We must have a callback function at our disposal when calling loadScript(script, callback). In other words, we must know what to do with the result before loadScript is called. |
We can call .then on a Promise as many times as we want. Each time, we’re adding a new “fan”, a new subscribing function, to the “subscription list”. |
There can be only one callback. |
So promises give us better code flow and flexibility. But there’s more. We’ll see that in the next part.
Promises chaining
Let’s return to the problem mentioned in javascript#callbacks : we have a sequence of asynchronous tasks to be performed one after another — for instance, loading scripts. How can we code it well?
Promises provide a couple of recipes to do that.
In this part we cover promise chaining.
It looks like this:
new Promise(function(resolve, reject) {

  setTimeout(() => resolve(1), 1000); // (*)

}).then(function(result) { // (**)

  alert(result); // 1
  return result * 2;

}).then(function(result) { // (***)

  alert(result); // 2
  return result * 2;

}).then(function(result) {

  alert(result); // 4
  return result * 2;

});
The idea is that the result is passed through the chain of .then handlers.
Here the flow is:
- The initial promise resolves in 1 second
(*), - Then the
.thenhandler is called(**), which in turn creates a new promise (resolved with2value). - The next
then (***)gets the result of the previous one, processes it (doubles) and passes it to the next handler. - …and so on.
As the result is passed along the chain of handlers, we can see a sequence ofalertcalls:1→2→4.
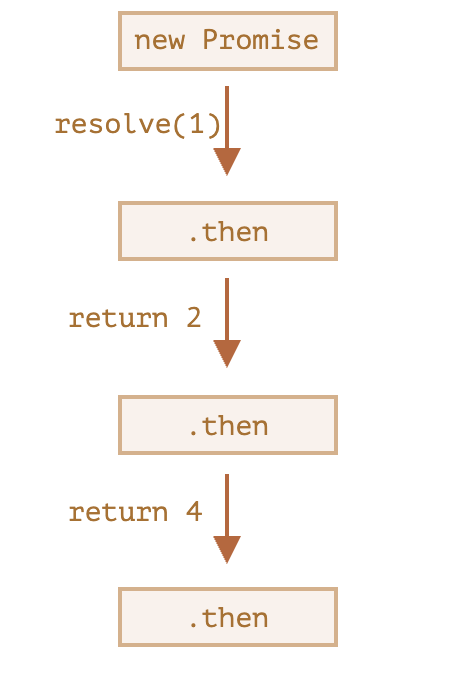
The whole thing works, because every call to a .then returns a new promise, so that we can call the next .then on it.
When a handler returns a value, it becomes the result of that promise, so the next .then is called with it.
A classic newbie error: technically we can also add many .then to a single promise. This is not chaining.
For example:
let promise = new Promise(function(resolve, reject) {
  setTimeout(() => resolve(1), 1000);
});

promise.then(function(result) {
  alert(result); // 1
  return result * 2;
});

promise.then(function(result) {
  alert(result); // 1
  return result * 2;
});

promise.then(function(result) {
  alert(result); // 1
  return result * 2;
});
What we did here is just several handlers to one promise. They don’t pass the result to each other; instead they process it independently.
Here’s the picture (compare it with the chaining above):
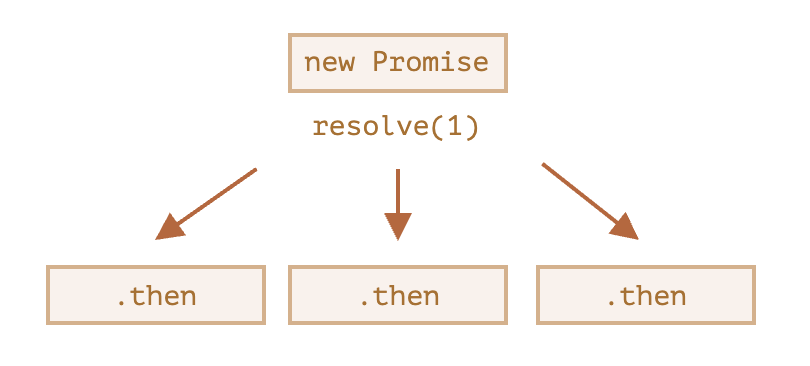
All .then on the same promise get the same result – the result of that promise. So in the code above all alert show the same: 1.
In practice we rarely need multiple handlers for one promise. Chaining is used much more often.
Returning promises
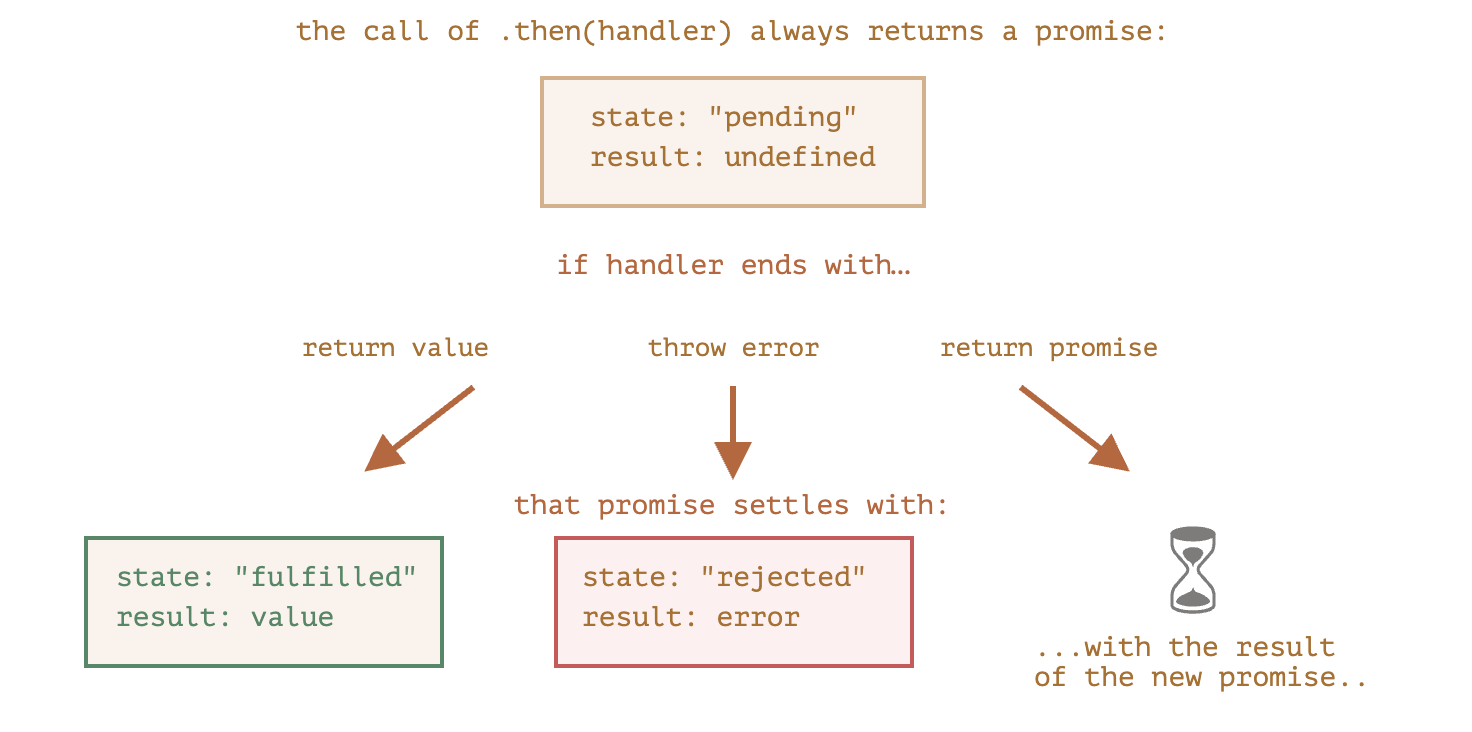
A handler, used in .then(handler) may create and return a promise.
In that case further handlers wait until it settles, and then get its result.
For instance:
new Promise(function(resolve, reject) {

  setTimeout(() => resolve(1), 1000);

}).then(function(result) {

  alert(result); // 1

  return new Promise((resolve, reject) => { // (*)
    setTimeout(() => resolve(result * 2), 1000);
  });

}).then(function(result) { // (**)

  alert(result); // 2

  return new Promise((resolve, reject) => {
    setTimeout(() => resolve(result * 2), 1000);
  });

}).then(function(result) {

  alert(result); // 4

});
Here the first.then shows 1 and returns new Promise(…) in the line (*). After one second it resolves, and the result (the argument of resolve, here it’s result * 2) is passed on to the handler of the second .then. That handler is in the line (**), it shows 2 and does the same thing.
So the output is the same as in the previous example: 1 → 2 → 4, but now with 1 second delay between alert calls.
Returning promises allows us to build chains of asynchronous actions.
Example: loadScript
Let’s use this feature with the promisified loadScript, defined in the previous parts, to load scripts one by one, in sequence:
loadScript("/article/promise-chaining/one.js")
  .then(function(script) {
    return loadScript("/article/promise-chaining/two.js");
  })
  .then(function(script) {
    return loadScript("/article/promise-chaining/three.js");
  })
  .then(function(script) {
    // use functions declared in scripts
    // to show that they indeed loaded
    one();
    two();
    three();
  });
This code can be made bit shorter with arrow functions:
loadScript("/article/promise-chaining/one.js")
  .then(script => loadScript("/article/promise-chaining/two.js"))
  .then(script => loadScript("/article/promise-chaining/three.js"))
  .then(script => {
    // scripts are loaded, we can use functions declared there
    one();
    two();
    three();
  });
Here each loadScript call returns a promise, and the next .then runs when it resolves Then it initiates the loading of the next script. So scripts are loaded one after another.
We can add more asynchronous actions to the chain. Please note that the code is still “flat” — it grows down, not to the right. There are no signs of the “pyramid of doom”.
Technically, we could add .then directly to each loadScript, like this:
loadScript("/article/promise-chaining/one.js").then(script1 => {
  loadScript("/article/promise-chaining/two.js").then(script2 => {
    loadScript("/article/promise-chaining/three.js").then(script3 => {
      // this function has access to variables script1, script2 and script3
      one();
      two();
      three();
    });
  });
});
This code does the same: loads 3 scripts in sequence. But it “grows to the right”. So we have the same problem as with callbacks.
People who start to use promises sometimes don’t know about chaining, so they write it this way. Generally, chaining is preferred.
Sometimes it’s ok to write.thendirectly, because the nested function has access to the outer scope. In the example above the most nested callback has access to all variables script1, script2, script3. But that’s an exception rather than a rule.
Thenables
To be precise, a handler may return not exactly a promise, but a so-called “thenable” object – an arbitrary object that has a method .then. It will be treated the same way as a promise.
The idea is that 3rd-party libraries may implement “promise-compatible” objects of their own. They can have an extended set of methods, but also be compatible with native promises, because they implement.then.
Here’s an example of a thenable object:
class Thenable {
  constructor(num) {
    this.num = num;
  }
  then(resolve, reject) {
    alert(resolve); // function() { native code }
    // resolve with this.num*2 after the 1 second
    setTimeout(() => resolve(this.num * 2), 1000); // (**)
  }
}

new Promise(resolve => resolve(1))
  .then(result => {
    return new Thenable(result); // (*)
  })
  .then(alert); // shows 2 after 1000ms
JavaScript checks the object returned by the .then handler in line (*): if it has a callable method named then, then it calls that method providing native functions resolve, reject as arguments (similar to an executor) and waits until one of them is called. In the example above resolve(2) is called after 1 second (**). Then the result is passed further down the chain.
This feature allows us to integrate custom objects with promise chains without having to inherit from Promise.
Bigger example: fetch
In frontend programming, promises are often used for network requests. So let’s see an extended example of that.
We’ll use the fetch method to load the information about the user from the remote server, the basic syntax is quite simple:
let promise = fetch(url);
This makes a network request to theurl and returns a promise. The promise resolves with a response object when the remote server responds with headers, but before the full response is downloaded.
To read the full response, we should call the method response.text(): it returns a promise that resolves when the full text is downloaded from the remote server, with that text as a result.
The code below makes a request to user.json and loads its text from the server:
fetch('/article/promise-chaining/user.json')
  // .then below runs when the remote server responds
  .then(function(response) {
    // response.text() returns a new promise that resolves with the full response text
    // when it loads
    return response.text();
  })
  .then(function(text) {
    // ...and here's the content of the remote file
    alert(text); // {"name": "iliakan", "isAdmin": true}
  });
The response object returned from fetch also includes the method response.json() that reads the remote data and parses it as JSON. In our case that’s even more convenient, so let’s switch to it.
We’ll also use arrow functions for brevity:
// same as above, but response.json() parses the remote content as JSON
fetch('/article/promise-chaining/user.json')
  .then(response => response.json())
  .then(user => alert(user.name)); // iliakan, got user name
Now let’s do something with the loaded user.
For instance, we can make one more request to GitHub, load the user profile and show the avatar:
// Make a request for user.json
fetch('/article/promise-chaining/user.json')
  // Load it as json
  .then(response => response.json())
  // Make a request to GitHub
  .then(user => fetch(`https://api.github.com/users/${user.name}`))
  // Load the response as json
  .then(response => response.json())
  // Show the avatar image (githubUser.avatar_url) for 3 seconds (maybe animate it)
  .then(githubUser => {
    let img = document.createElement('img');
    img.src = githubUser.avatar_url;
    img.className = "promise-avatar-example";
    document.body.append(img);

    setTimeout(() => img.remove(), 3000); // (*)
  });
The code works; However, there’s a potential problem in it, a typical error for those who begin to use promises.
Look at the line(*): how can we do something after the avatar has finished showing and gets removed? For instance, we’d like to show a form for editing that user or something else. As of now, there’s no way.
To make the chain extendable, we need to return a promise that resolves when the avatar finishes showing.
Like this:
fetch('/article/promise-chaining/user.json')
  .then(response => response.json())
  .then(user => fetch(`https://api.github.com/users/${user.name}`))
  .then(response => response.json())
  .then(githubUser => new Promise(function(resolve, reject) { // (*)
    let img = document.createElement('img');
    img.src = githubUser.avatar_url;
    img.className = "promise-avatar-example";
    document.body.append(img);

    setTimeout(() => {
      img.remove();
      resolve(githubUser); // (**)
    }, 3000);
  }))
  // triggers after 3 seconds
  .then(githubUser => alert(`Finished showing ${githubUser.name}`));
That is, the.then handler in line (*) now returns new Promise, that becomes settled only after the call of resolve(githubUser) in setTimeout(**). The next .then in the chain will wait for that.
As a good practice, an asynchronous action should always return a promise. That makes it possible to plan actions after it; even if we don’t plan to extend the chain now, we may need it later.
Finally, we can split the code into reusable functions:
function loadJson(url) {
  return fetch(url)
    .then(response => response.json());
}

function loadGithubUser(name) {
  return loadJson(`https://api.github.com/users/${name}`);
}

function showAvatar(githubUser) {
  return new Promise(function(resolve, reject) {
    let img = document.createElement('img');
    img.src = githubUser.avatar_url;
    img.className = "promise-avatar-example";
    document.body.append(img);

    setTimeout(() => {
      img.remove();
      resolve(githubUser);
    }, 3000);
  });
}

// Use them:
loadJson('/article/promise-chaining/user.json')
  .then(user => loadGithubUser(user.name))
  .then(showAvatar)
  .then(githubUser => alert(`Finished showing ${githubUser.name}`));
  // ...
Summary
If a .then (orcatch/finally, doesn’t matter) handler returns a promise, the rest of the chain waits until it settles. When it does, its result (or error) is passed further.
Here’s a full picture:
Async/await
There’s a special syntax to work with promises in a more comfortable fashion, called “async/await”. It’s surprisingly easy to understand and use.
Async functions
Let’s start with the async keyword. It can be placed before a function, like this:
async function f() {
  return 1;
}
The word “async” before a function means one simple thing: a function always returns a promise. Other values are wrapped in a resolved promise automatically.
For instance, this function returns a resolved promise with the result of 1; let’s test it:
async function f() {
  return 1;
}

f().then(alert); // 1
…We could explicitly return a promise, which would be the same:
async function f() {
  return Promise.resolve(1);
}

f().then(alert); // 1
So, async ensures that the function returns a promise, and wraps non-promises in it. Simple enough, right? But not only that. There’s another keyword,await, that works only inside async functions, and it’s pretty cool.
Await
The syntax:
// works only inside async functions
let value = await promise;
The keyword await makes JavaScript wait until that promise settles and returns its result.
Here’s an example with a promise that resolves in 1 second:
async function f() {

  let promise = new Promise((resolve, reject) => {
    setTimeout(() => resolve("done!"), 1000)
  });

  let result = await promise; // wait until the promise resolves (*)

  alert(result); // "done!"
}

f();
The function execution “pauses” at the line(*) and resumes when the promise settles, with result becoming its result. So the code above shows “done!” in one second.
Let’s emphasize: await literally suspends the function execution until the promise settles, and then resumes it with the promise result. That doesn’t cost any CPU resources, because the JavaScript engine can do other jobs in the meantime: execute other scripts, handle events, etc.
It’s just a more elegant syntax of getting the promise result than promise.then. And, it’s easier to read and write.
Can’t use await in regular functions
If we try to use await in a non-async function, there would be a syntax error:
function f() {
  let promise = Promise.resolve(1);
  let result = await promise; // Syntax error
}
We may get this error if we forget to put async before a function. As stated earlier, await only works inside an async function.
Let’s take the showAvatar() example from Promises chaining and rewrite it using async/await:
We’ll need to replace .then calls with await.
Also we should make the function async for them to work.
async function showAvatar() {

  // read our JSON
  let response = await fetch('/article/promise-chaining/user.json');
  let user = await response.json();

  // read github user
  let githubResponse = await fetch(`https://api.github.com/users/${user.name}`);
  let githubUser = await githubResponse.json();

  // show the avatar
  let img = document.createElement('img');
  img.src = githubUser.avatar_url;
  img.className = "promise-avatar-example";
  document.body.append(img);

  // wait 3 seconds
  await new Promise((resolve, reject) => setTimeout(resolve, 3000));

  img.remove();

  return githubUser;
}

showAvatar();
Pretty clean and easy to read, right? Much better than before.
Modern browsers allow top-level await in modules
In modern browsers, await on top level works just fine, when we’re inside a module.
For instance:
// we assume this code runs at top level, inside a module
let response = await fetch('/article/promise-chaining/user.json');
let user = await response.json();

console.log(user);
If we’re not using modules, or older browsers must be supported, there’s a universal recipe: wrapping into an anonymous async function.
Like this:
(async () => {
  let response = await fetch('/article/promise-chaining/user.json');
  let user = await response.json();
  ...
})();
await accepts “thenables”
Like promise.then, await allows us to use thenable objects (those with a callable then method). The idea is that a third-party object may not be a promise, but promise-compatible: if it supports.then, that’s enough to use it with await.
Here’s a demo Thenable class; the await below accepts its instances:
class Thenable {
  constructor(num) {
    this.num = num;
  }
  then(resolve, reject) {
    alert(resolve);
    // resolve with this.num*2 after 1000ms
    setTimeout(() => resolve(this.num * 2), 1000); // (*)
  }
}

async function f() {
  // waits for 1 second, then result becomes 2
  let result = await new Thenable(1);
  alert(result);
}

f();
If await gets a non-promise object with .then, it calls that method providing the built-in functions resolve and reject as arguments (just as it does for a regular Promise executor). Then await waits until one of them is called (in the example above it happens in the line(*)) and then proceeds with the result.
Async class methods
To declare an async class method, just prepend it with async:
class Waiter {
  async wait() {
    return await Promise.resolve(1);
  }
}

new Waiter()
  .wait()
  .then(alert); // 1 (this is the same as (result => alert(result)))
The meaning is the same: it ensures that the returned value is a promise and enables await.
Error handling
If a promise resolves normally, then await promise returns the result. But in the case of a rejection, it throws the error, just as if there were a throw statement at that line.
This code:
async function f() {
  await Promise.reject(new Error("Whoops!"));
}
…is the same as this:
async function f() {
  throw new Error("Whoops!");
}
In real situations, the promise may take some time before it rejects. In that case there will be a delay before await throws an error.
We can catch that error using try..catch, the same way as a regular throw:
async function f() {

  try {
    let response = await fetch('http://no-such-url');
  } catch(err) {
    alert(err); // TypeError: failed to fetch
  }
}

f();
In the case of an error, the control jumps to the catch block. We can also wrap multiple lines:
async function f() {

  try {
    let response = await fetch('/no-user-here');
    let user = await response.json();
  } catch(err) {
    // catches errors both in fetch and response.json
    alert(err);
  }
}

f();
If we don’t havetry..catch, then the promise generated by the call of the async function f() becomes rejected. We can append .catch to handle it:
async function f() {
  let response = await fetch('http://no-such-url');
}

// f() becomes a rejected promise
f().catch(alert); // TypeError: failed to fetch // (*)
If we forget to add.catch there, then we get an unhandled promise error (viewable in the console). We can catch such errors using a global unhandledrejection event handler .
async/await and promise.then/catch
When we use async/await, we rarely need .then, because await handles the waiting for us. And we can use a regular try..catch instead of .catch. That’s usually (but not always) more convenient.
But at the top level of the code, when we’re outside any async function, we’re syntactically unable to use await, so it’s a normal practice to add .then/catch to handle the final result or falling-through error, like in the line(*) of the example above.
async/await works well with Promise.all
When we need to wait for multiple promises, we can wrap them in Promise.all and then await:
// wait for the array of results
let results = await Promise.all([
  fetch(url1),
  fetch(url2),
  ...
]);
In the case of an error, it propagates as usual, from the failed promise to Promise.all, and then becomes an exception that we can catch using try..catcharound the call.
Summary
The async keyword before a function has two effects:
- Makes it always return a promise.
- Allows
awaitto be used in it.
The await keyword before a promise makes JavaScript wait until that promise settles, and then:
- If it’s an error, an exception is generated — same as if
throw errorwere called at that very place. - Otherwise, it returns the result.
Together they provide a great framework to write asynchronous code that is easy to both read and write.
With async/await we rarely need to write promise.then/catch, but we still shouldn’t forget that they are based on promises, because sometimes (e.g. in the outermost scope) we have to use these methods. Also Promise.all is nice when we are waiting for many tasks simultaneously.
Introduction to Events
Bubbling and capturing
Let’s start with an example.
This handler is assigned to <div>, but also runs if you click any nested tag like <em> or <code>:
<div onclick="alert('The handler!')">
  <em>If you click on <code>EM</code>, the handler on <code>DIV</code> runs.</em>
</div>
Isn’t it a bit strange? Why does the handler on <div> run if the actual click was on <em>?
Bubbling
The bubbling principle is simple.
When an event happens on an element, it first runs the handlers on it, then on its parent, then all the way up on other ancestors.
Let’s say we have 3 nested elements FORM > DIV > P with a handler on each of them:
<style>
  body * {
    margin: 10px;
    border: 1px solid blue;
  }
</style>

<form onclick="alert('form')">FORM
  <div onclick="alert('div')">DIV
    <p onclick="alert('p')">P</p>
  </div>
</form>

A click on the inner <p> first runs onclick:
- On that
<p>. - Then on the outer
<div>. - Then on the outer
<form>.
And so on upwards till thedocumentobject.
So if we click on <p>, then we’ll see 3 alerts: p → div → form.
The process is called “bubbling”, because events “bubble” from the inner element up through parents like a bubble in the water.
Almost all events bubble.
The key word in this phrase is “almost”.
For instance, a focus event does not bubble. There are other examples too, we’ll meet them. But still it’s an exception, rather than a rule, most events do bubble.
event.target
A handler on a parent element can always get the details about where it actually happened.
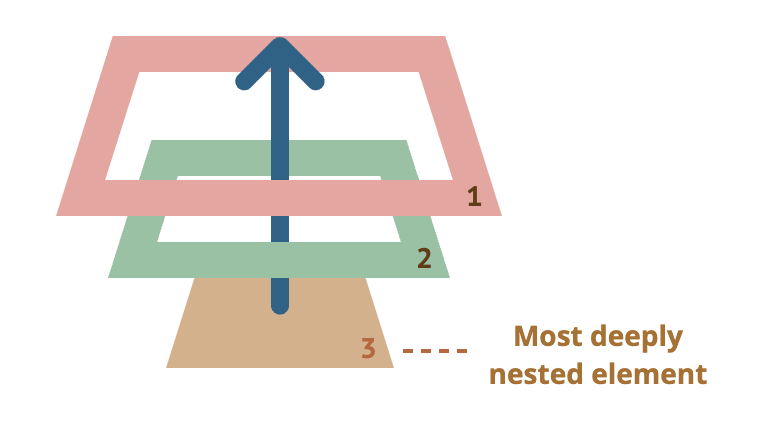
The most deeply nested element that caused the event is called a target element, accessible as event.target.
Note the differences from this (=event.currentTarget):
event.target– is the “target” element that initiated the event, it doesn’t change through the bubbling process.this– is the “current” element, the one that has a currently running handler on it.
For instance, if we have a single handler form.onclick, then it can “catch” all clicks inside the form. No matter where the click happened, it bubbles up to <form> and runs the handler.
In form.onclick handler:
this(=event.currentTarget) is the<form>element, because the handler runs on it.event.targetis the actual element inside the form that was clicked.
It’s possible that event.target could equal this – it happens when the click is made directly on the <form> element.
Stopping bubbling
A bubbling event goes from the target element straight up. Normally it goes upwards till <html>, and then to document object, and some events even reach window, calling all handlers on the path.
But any handler may decide that the event has been fully processed and stop the bubbling.
The method for it is event.stopPropagation().
For instance, here body.onclick doesn’t work if you click on <button>:
<body onclick="alert(`the bubbling doesn't reach here`)">
  <button onclick="event.stopPropagation()">Click me</button>
</body>
event.stopImmediatePropagation()
If an element has multiple event handlers on a single event, then even if one of them stops the bubbling, the other ones still execute.
In other words, event.stopPropagation() stops the move upwards, but on the current element all other handlers will run.
To stop the bubbling and prevent handlers on the current element from running, there’s a method event.stopImmediatePropagation(). After it no other handlers execute.
Don’t stop bubbling without a need!
Bubbling is convenient. Don’t stop it without a real need: obvious and architecturally well thought out.
Sometimes event.stopPropagation() creates hidden pitfalls that later may become problems.
For instance:
- We create a nested menu. Each submenu handles clicks on its elements and calls
stopPropagationso that the outer menu won’t trigger. - Later we decide to catch clicks on the whole window, to track users’ behavior (where people click). Some analytic systems do that. Usually the code uses
document.addEventListener('click'…)to catch all clicks. - Our analytic won’t work over the area where clicks are stopped by stopPropagation. Sadly, we’ve got a “dead zone”.
There’s usually no real need to prevent the bubbling. A task that seemingly requires that may be solved by other means. One of them is to use custom events. Also we can write our data into the event object in one handler and read it in another one, so we can pass to handlers on parents information about the processing below.
Capturing
There’s another phase of event processing called “capturing”. It is rarely used in real code, but sometimes can be useful.
The standard DOM Events describes 3 phases of event propagation:
- Capturing phase – the event goes down to the element.
- Target phase – the event reached the target element.
- Bubbling phase – the event bubbles up from the element.
Here’s the picture, taken from the specification, of the capturing (1), target (2)and bubbling (3) phases for a click event on a <td> inside a table:
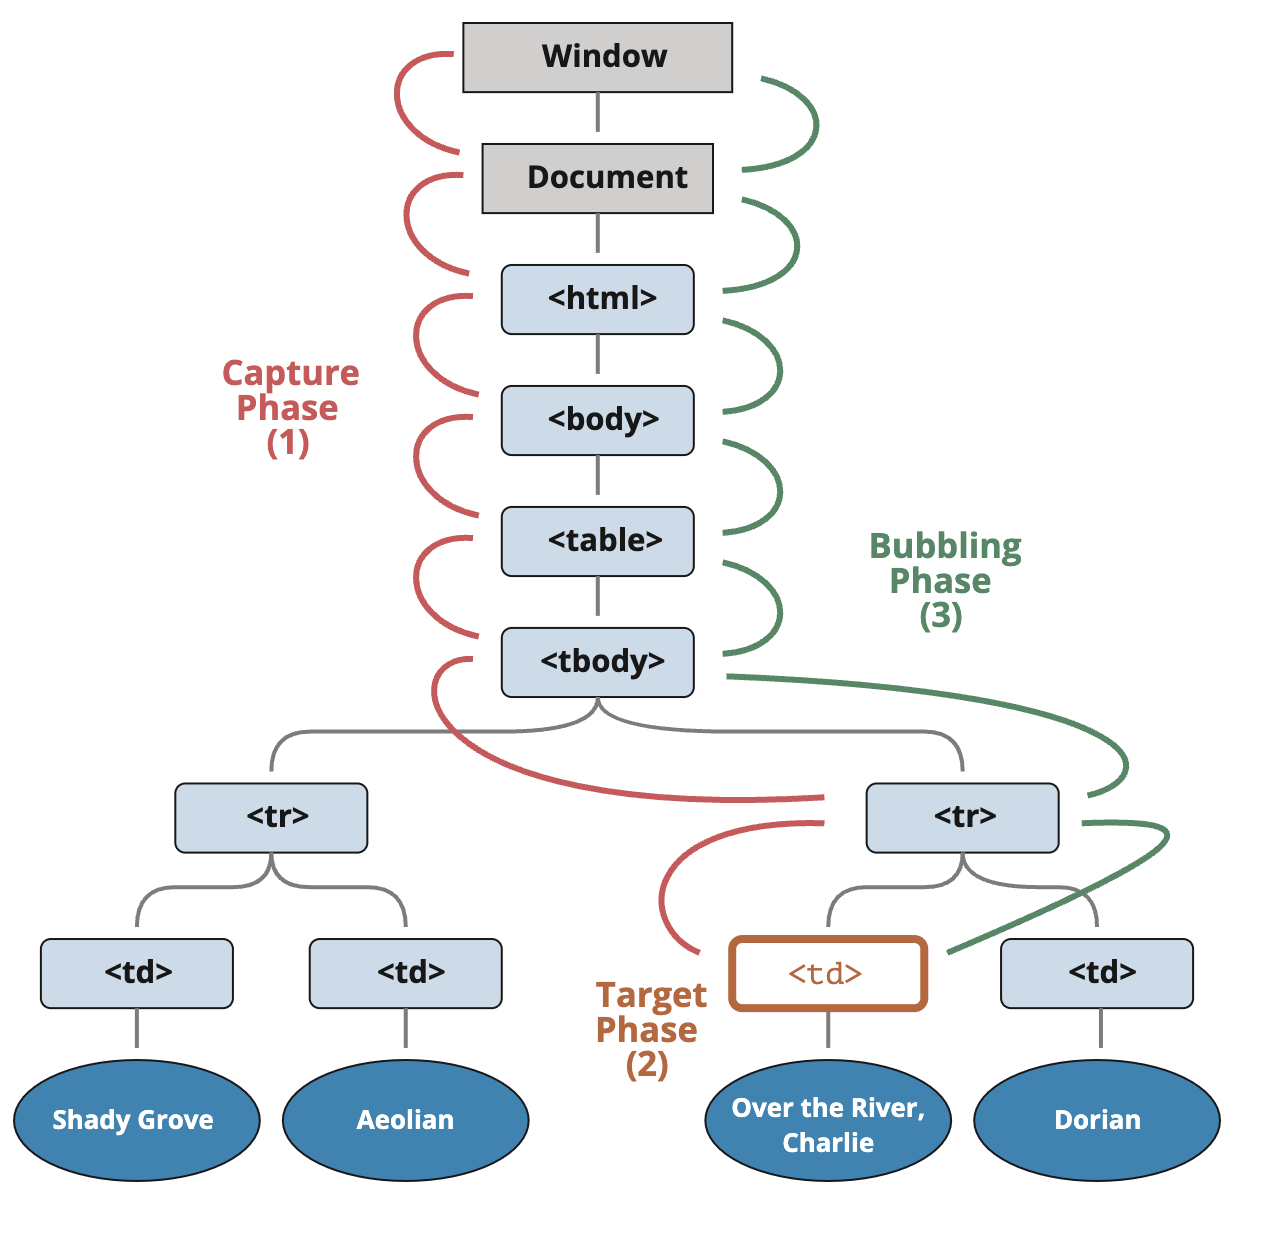
That is: for a click on <td> the event first goes through the ancestors chain down to the element (capturing phase), then it reaches the target and triggers there (target phase), and then it goes up (bubbling phase), calling handlers on its way.
Until now, we only talked about bubbling, because the capturing phase is rarely used.
In fact, the capturing phase was invisible for us, because handlers added using on<event>-property or using HTML attributes or using two-argument addEventListener(event, handler) don’t know anything about capturing, they only run on the 2nd and 3rd phases.
To catch an event on the capturing phase, we need to set the handler capture option to true:
elem.addEventListener(..., {capture: true})

// or, just "true" is an alias to {capture: true}
elem.addEventListener(..., true)
There are two possible values of the capture option:
- If it’s
false(default), then the handler is set on the bubbling phase. - If it’s
true, then the handler is set on the capturing phase.
Note that while formally there are 3 phases, the 2nd phase (“target phase”: the event reached the element) is not handled separately: handlers on both capturing and bubbling phases trigger at that phase.
Let’s see both capturing and bubbling in action:
<style>
  body * {
    margin: 10px;
    border: 1px solid blue;
  }
</style>

<form>FORM
  <div>DIV
    <p>P</p>
  </div>
</form>

<script>
  for(let elem of document.querySelectorAll('*')) {
    elem.addEventListener("click", e => alert(`Capturing: ${elem.tagName}`), true);
    elem.addEventListener("click", e => alert(`Bubbling: ${elem.tagName}`));
  }
</script>
The code sets click handlers on every element in the document to see which ones are working.
If you click on <p>, then the sequence is:
- HTML → BODY → FORM → DIV -> P (capturing phase, the first listener):
- P → DIV → FORM → BODY → HTML (bubbling phase, the second listener).
Please note, the P shows up twice, because we’ve set two listeners: capturing and bubbling. The target triggers at the end of the first and at the beginning of the second phase.
There’s a property event.eventPhase that tells us the number of the phase on which the event was caught. But it’s rarely used, because we usually know it in the handler.
To remove the handler, removeEventListener needs the same phase
If we addEventListener(..., true), then we should mention the same phase in removeEventListener(..., true) to correctly remove the handler.
Listeners on the same element and same phase run in their set order
If we have multiple event handlers on the same phase, assigned to the same element with addEventListener, they run in the same order as they are created:
elem.addEventListener("click", e => alert(1)); // guaranteed to trigger first
elem.addEventListener("click", e => alert(2));
The event.stopPropagation() during the capturing also prevents the bubbling
The event.stopPropagation() method and its sibling event.stopImmediatePropagation() can also be called on the capturing phase. Then not only the futher capturing is stopped, but the bubbling as well.
In other words, normally the event goes first down (“capturing”) and then up (“bubbling”). But if event.stopPropagation() is called during the capturing phase, then the event travel stops, no bubbling will occur.
Summary
When an event happens – the most nested element where it happens gets labeled as the “target element” (event.target).
- Then the event moves down from the document root to
event.target, calling handlers assigned withaddEventListener(..., true)on the way (trueis a shorthand for{capture: true}). - Then handlers are called on the target element itself.
- Then the event bubbles up from
event.targetto the root, calling handlers assigned usingon<event>, HTML attributes andaddEventListenerwithout the 3rd argument or with the 3rdargument false/{capture:false}.
Each handler can access event object properties:
event.target– the deepest element that originated the event.event.currentTarget(=this) – the current element that handles the event (the one that has the handler on it)event.eventPhase– the current phase (capturing=1, target=2, bubbling=3).
Any event handler can stop the event by calling event.stopPropagation(), but that’s not recommended, because we can’t really be sure we won’t need it above, maybe for completely different things.
The capturing phase is used very rarely, usually we handle events on bubbling. And there’s a logical explanation for that.
In real world, when an accident happens, local authorities react first. They know best the area where it happened. Then higher-level authorities if needed.
The same for event handlers. The code that set the handler on a particular element knows maximum details about the element and what it does. A handler on a particular <td> may be suited for that exactly <td>, it knows everything about it, so it should get the chance first. Then its immediate parent also knows about the context, but a little bit less, and so on till the very top element that handles general concepts and runs the last one.
Bubbling and capturing lay the foundation for “event delegation” – an extremely powerful event handling pattern that we study in the next part.
Network requets
Fetch
JavaScript can send network requests to the server and load new information whenever it’s needed.
For example, we can use a network request to:
- Submit an order,
- Load user information,
- Receive latest updates from the server,
- …etc.
…And all of that without reloading the page!
There’s an umbrella term “AJAX” (abbreviated Asynchronous JavaScript And XML) for network requests from JavaScript. We don’t have to use XML though: the term comes from old times, that’s why that word is there. You may have heard that term already.
There are multiple ways to send a network request and get information from the server.
The fetch() method is modern and versatile, so we’ll start with it. It’s not supported by old browsers (can be polyfilled), but very well supported among the modern ones.
The basic syntax is:
let promise = fetch(url, [options])
- url – the URL to access.
- options – optional parameters: method, headers etc.
Without options, this is a simple GET request, downloading the contents of the url.
The browser starts the request right away and returns a promise that the calling code should use to get the result.
Getting a response is usually a two-stage process.
First, the promise, returned by fetch, resolves with an object of the built-inResponse class as soon as the server responds with headers.
At this stage we can check HTTP status, to see whether it is successful or not, check headers, but don’t have the body yet.
The promise rejects if the fetch was unable to make HTTP-request, e.g. network problems, or there’s no such site. Abnormal HTTP-statuses, such as 404 or 500 do not cause an error.
We can see HTTP-status in response properties:
status– HTTP status code, e.g. 200.ok– boolean, true if the HTTP status code is 200-299.
For example:
let response = await fetch(url);

if (response.ok) { // if HTTP-status is 200-299
  // get the response body (the method explained below)
  let json = await response.json();
} else {
  alert("HTTP-Error: " + response.status);
}
Second, to get the response body, we need to use an additional method call.
Response provides multiple promise-based methods to access the body in various formats:
response.text()– read the response and return as text,response.json()– parse the response as JSON,response.formData()– return the response asFormDataobject (explained in the next part),response.blob()– return the response as Blob (binary data with type),response.arrayBuffer()– return the response as ArrayBuffer (low-level representation of binary data),- additionally,
response.bodyis a ReadableStream object, it allows you to read the body chunk-by-chunk, we’ll see an example later.
For instance, let’s get a JSON-object with latest commits from GitHub:
let url = 'https://api.github.com/repos/javascript-tutorial/en.javascript.info/commits';
let response = await fetch(url);

let commits = await response.json(); // read response body and parse as JSON

alert(commits[0].author.login);
Or, the same without await, using pure promises syntax:
fetch('https://api.github.com/repos/javascript-tutorial/en.javascript.info/commits')
  .then(response => response.json())
  .then(commits => alert(commits[0].author.login));
To get the response text, await response.text() instead of .json():
let response = await fetch('https://api.github.com/repos/javascript-tutorial/en.javascript.info/commits');

let text = await response.text(); // read response body as text

alert(text.slice(0, 80) + '...');
As a show-case for reading in binary format, let’s fetch and show a logo image of “fetch” specification (see Blob part (pending ) for details about operations on Blob):
let response = await fetch('/article/fetch/logo-fetch.svg');

let blob = await response.blob(); // download as Blob object

// create <img> for it
let img = document.createElement('img');
img.style = 'position:fixed;top:10px;left:10px;width:100px';
document.body.append(img);

// show it
img.src = URL.createObjectURL(blob);

setTimeout(() => { // hide after three seconds
  img.remove();
  URL.revokeObjectURL(img.src);
}, 3000);
Important:
We can choose only one body-reading method.
If we’ve already got the response with response.text(), then response.json() won’t work, as the body content has already been processed.
let text = await response.text(); // response body consumed
let parsed = await response.json(); // fails (already consumed)
Response headers
The response headers are available in a Map-like headers object in response.header.
It’s not exactly a Map, but it has similar methods to get individual headers by name or iterate over them:
let response = await fetch('https://api.github.com/repos/javascript-tutorial/en.javascript.info/commits');

// get one header
alert(response.headers.get('Content-Type')); // application/json; charset=utf-8

// iterate over all headers
for (let [key, value] of response.headers) {
  alert(`${key} = ${value}`);
}
Request headers
To set a request header in fetch, we can use the headers option. It has an object with outgoing headers, like this:
let response = fetch(protectedUrl, {
  headers: {
    Authentication: 'secret'
  }
});
…But there’s a list of forbidden HTTP headers that we can’t set:
- Accept-Charset, Accept-Encoding
- Access-Control-Request-Headers
- Access-Control-Request-Method
- Connection
- Content-Length
- Cookie, Cookie2
- Date
- DNT
- Expect
- Host
- Keep-Alive
- Origin
- Referer
- TE
- Trailer
- Transfer-Encoding
- Upgrade
- Via
- Proxy-*
- Sec-*
These headers ensure proper and safe HTTP, so they are controlled exclusively by the browser.
POST requests
To make a POST request, or a request with another method, we need to use fetch options:
method– HTTP-method, e.g.POST,body– the request body, one of:- a string (e.g. JSON-encoded),
FormDataobject, to submit the data asmultipart/form-data,Blob/BufferSourceto send binary data,URLSearchParams, to submit the data inx-www-form-urlencodedencoding, rarely used.
The JSON format is used most of the time.
For example, this code submits user object as JSON:
let user = {
  name: 'John',
  surname: 'Smith'
};

let response = await fetch('/article/fetch/post/user', {
  method: 'POST',
  headers: {
    'Content-Type': 'application/json;charset=utf-8'
  },
  body: JSON.stringify(user)
});

let result = await response.json();
alert(result.message);
Please note, if the request body is a string, then Content-Type header is set to text/plain;charset=UTF-8 by default.
But, as we’re going to send JSON, we use headers option to send application/json instead, the correct Content-Type for JSON-encoded data.
Sending an image
We can also submit binary data with fetch using Blob or BufferSource objects.
In this example, there’s a <canvas> where we can draw by moving a mouse over it. A click on the “submit” button sends the image to the server:
<body style="margin:0">
  <canvas id="canvasElem" width="100" height="80" style="border:1px solid"></canvas>

  <input type="button" value="Submit" onclick="submit()">

  <script>
    canvasElem.onmousemove = function(e) {
      let ctx = canvasElem.getContext('2d');
      ctx.lineTo(e.clientX, e.clientY);
      ctx.stroke();
    };

    async function submit() {
      let blob = await new Promise(resolve => canvasElem.toBlob(resolve, 'image/png'));
      let response = await fetch('/article/fetch/post/image', {
        method: 'POST',
        body: blob
      });

      // the server responds with confirmation and the image size
      let result = await response.json();
      alert(result.message);
    }

  </script>
</body>
Please note, here we don’t set Content-Type header manually, because a Blob object has a built-in type (here image/png, as generated by toBlob). For Blob objects that type becomes the value of Content-Type.
The submit() function can be rewritten without async/await like this:
function submit() {
  canvasElem.toBlob(function(blob) {
    fetch('/article/fetch/post/image', {
      method: 'POST',
      body: blob
    })
      .then(response => response.json())
      .then(result => alert(JSON.stringify(result, null, 2)))
  }, 'image/png');
}
Summary
A typical fetch request consists of two await calls:
let response = await fetch(url, options); // resolves with response headers
let result = await response.json(); // read body as json
Or, without await:
fetch(url, options)
  .then(response => response.json())
  .then(result => /* process result */)
Response properties:
- response.status – HTTP code of the response,
- response.ok – true if the status is 200-299.
- response.headers – Map-like object with HTTP headers.
Methods to get response body:
- response.text() – return the response as text,
- response.json() – parse the response as JSON object,
- response.formData() – return the response as FormData object (multipart/form-data encoding, see the next chapter),
- response.blob() – return the response as Blob (binary data with type),
- response.arrayBuffer() – return the response as ArrayBuffer (low-level binary data),
Fetch options so far:
- method – HTTP-method,
- headers – an object with request headers (not any header is allowed),
- body – the data to send (request body) as string, FormData, BufferSource, Blob or UrlSearchParams object.
In the next parts we’ll see more options and use cases of fetch.
Framewoerks of JavaScript
Details see : javascript-frameworks