Vue.js
What' s Vue.js
-
MVVM模型
- M:模型(Model): data中的数据
- V:视图(View): 模板代码
- VM:视图模型(ViewModel): Vue实例
-
观察发现:
- data中所有的属性,最后都出现在了vm身上。
- vm身上所有的属性及Vue原型上所有属性 在Vue模板中都可以直接使用
基本语法 / 基础知识
模版语法
-
插值语法
- 用于解析标签体内容 可以直接读取到data中的所有属性
-
指令语法
- 用于解析标签(标签属性,标签体内容,绑定事件)
数据绑定
- Vue中有2种数据绑定的方式:
- 单向绑定(v-bind):数据只能从data流向页面。
- 双向绑定(v-model):数据不仅能从data流向页面,还可以从页面流向data。
- 备注:
- 双向绑定一般都应用在表单类元素上(如:input、select等)
- v-model: value可以简写为v-model, 因为v-model默认收集的就是value值
data与el的2种写法
-
el 有2种写法
- new Vue时候配置el属性。
- 先创建Vue实例,随后再通过vm.$mount('#root')指定el的值。
//el的两种写法
 const v = new Vue({
	//el:'#root', //第一种写法
	data:{
		name:'text'
	}
})
console.log(v)
v.$mount('#root') //第二种写法
-
data有2种写法
- 对象式
- 函数式
- 如何选择:使用组件时,data必须使用函数式,否则会报错
-
一个重要的原则:
由Vue管理的函数,一定不要写箭头函数,一旦写了箭头函数,this就不再是Vue实例了
数据代理
Object.defineproperty方法
<script type="text/javascript" >
			let number = 18
			let person = {
				name:'张三',
				sex:'男',
			}

			Object.defineProperty(person,'age',{
				// value:18,
				// enumerable:true, //控制属性是否可以枚举,默认值是false
				// writable:true, //控制属性是否可以被修改,默认值是false
				// configurable:true //控制属性是否可以被删除,默认值是false

				//当有人读取person的age属性时,get函数(getter)就会被调用,且返回值就是age的值
				get(){
					console.log('有人读取age属性了')
					return number
				},

				//当有人修改person的age属性时,set函数(setter)就会被调用,且会收到修改的具体值
				set(value){
					console.log('有人修改了age属性,且值是',value)
					number = value
				}

			})

			// console.log(Object.keys(person))

			console.log(person)
		</script>
数据代理的定义
<!-- 数据代理:通过一个对象代理对另一个对象中属性的操作(读/写)-->
		<script type="text/javascript" >
			let obj = {x:100}
			let obj2 = {y:200}

			Object.defineProperty(obj2,'x',{
				get(){
					return obj.x
				},
				set(value){
					obj.x = value
				}
			})
		</script>
Vue中的数据代理
- Vue中的数据代理:
通过vm对象来代理data对象中属性的操作(读/写)
- Vue中数据代理的好处:
更加方便的操作data中的数据
- 基本原理:
通过Object.defineProperty()把data对象中所有属性添加到vm上
为每一个添加到vm上的属性,都指定一个getter/setter
在getter/setter内部去操作(读/写)data中对应的属性
事件处理
事件的基本使用
- 使用
v-on:xxx或@xxx绑定事件,其中xxx是事件名 - 事件的回调需要配置在methods对象中,最终会在vm上;
- methods中配置的函数,不要用箭头函数!否则this就不是vm了;
- methods中配置的函数,都是被Vue所管理的函数,this的指向是vm或组件实例对象;
@click="demo"和@click="demo($event)"效果一致,但后者可以传参
Vue中的事件修饰符
- prevent:阻止默认事件(常用);
- stop:阻止事件冒泡(常用);
- once:事件只触发一次(常用);
- capture:使用事件的捕获模式;
- self:只有event.target是当前操作的元素时才触发事件;
- passive:事件的默认行为立即执行,无需等待事件回调执行完毕
键盘事件
-
Vue中常用的按键别名
- 回车 => enter
- 删除=> delete (捕获“删除”和退格”键
- 退出=> esc
- 空格=> space
- 换行=> tab (特殊,必须配合keydown去使用)
- 上=> up
- 下=> down
- 左=> left
- 右=> right
-
Vue未提供别名的按键,可以使用按键原始的key值去绑定,但注意要转为kebab-case(短横线命名)
-
系统修饰键(用法特殊):ctrl、alt、shift、meta
配. kyup使用:按下修饰键的同时,再按下其他键,随后释放其他键,事件才被蚀发。
配. keydown使用:正常触发事件。 -
也可以使用keyCode去指定具体的按键(不推荐)
-
Vue.config.keyCodes.自定义键名=键码,可以去定制按键别名
计算属性与监视
计算属性
-
定义:要用的属性不存在,要通过已有属性计算得来。
-
原理:底层借助了Objcet.defineproperty方法提供的getter和setter。
-
get函数什么时候执行?
- 初次读取时会执行一次。
- 当依赖的数据发生改变时会被再次调用。
-
优势:与methods实现相比,内部有缓存机制(复用)效率更高,调试方便
-
备注
- 计算属性最终会出现在vm上,直接读取使用即可。
- 如果计算属性要被修改,那必须写set函数去响应修改,且set中要引起计算时依赖的数据发生改变
<div id="root">
			姓:<input type="text" v-model="firstName"> <br/><br/>
			名:<input type="text" v-model="lastName"> <br/><br/>
			测试:<input type="text" v-model="x"> <br/><br/>
			全名:<span></span> <br/><br/>
			<!-- 全名:<span></span> <br/><br/>
			全名:<span></span> <br/><br/>
			全名:<span></span> -->
		</div>
	</body>

	<script type="text/javascript">
		Vue.config.productionTip = false //阻止 vue 在启动时生成生产提示。

		const vm = new Vue({
			el:'#root',
			data:{
				firstName:'张',
				lastName:'三',
				x:'你好'
			},
			methods: {
				demo(){
				}
			},
			computed:{
				fullName:{
					//get有什么作用?当有人读取fullName时,get就会被调用,且返回值就作为fullName的值
					//get什么时候调用?1.初次读取fullName时。2.所依赖的数据发生变化时。
					get(){
						console.log('get被调用了')
						// console.log(this) //此处的this是vm
						return this.firstName + '-' + this.lastName
					},
					//set什么时候调用? 当fullName被修改时。
					set(value){
						console.log('set',value)
						const arr = value.split('-')
						this.firstName = arr[0]
						this.lastName = arr[1]
					}
				}
			}
		})
	</script>
监视属性watch
- 当被监视的属性变化时,回调函数自动调用,进行相关操作
- 监视的属性必须存在,才能进行监视!!
- 监视的两种写法:
- new Vue时传入watch配置
- 通过vm.$watch监视
<div id="root">
			<h2>今天天气很</h2>
			<button @click="changeWeather">切换天气</button>
		</div>
	</body>

	<script type="text/javascript">
		Vue.config.productionTip = false //阻止 vue 在启动时生成生产提示。

		const vm = new Vue({
			el:'#root',
			data:{
				isHot:true,
			},
			computed:{
				info(){
					return this.isHot ? '炎热' : '凉爽'
				}
			},
			methods: {
				changeWeather(){
					this.isHot = !this.isHot
				}
			},
			/* watch:{
				isHot:{
					immediate:true, //初始化时让handler调用一下
					//handler什么时候调用?当isHot发生改变时。
					handler(newValue,oldValue){
						console.log('isHot被修改了',newValue,oldValue)
					}
				}
			} */
		})

		vm.$watch('isHot',{
			immediate:true, //初始化时让handler调用一下
			//handler什么时候调用?当isHot发生改变时。
			handler(newValue,oldValue){
				console.log('isHot被修改了',newValue,oldValue)
			}
		})
	</script>
深度监视
- Vue中的watch默认不监测对象内部值的改变(一层)。
- 配置
deep:true可以监测对象内部值改变(多层)
- 备注:
- Vue自身可以监测对象内部值的改变,但Vue提供的watch默认不可以!
- 使用watch时根据数据的具体结构,决定是否采用深度监视。
watch简写
const vm = new Vue({
			el:'#root',
			data:{
				isHot:true,
			},
			computed:{
				info(){
					return this.isHot ? '炎热' : '凉爽'
				}
			},
			methods: {
				changeWeather(){
					this.isHot = !this.isHot
				}
			},
			watch:{
				//正常写法
				/* isHot:{
					// immediate:true, //初始化时让handler调用一下
					// deep:true,//深度监视
					handler(newValue,oldValue){
						console.log('isHot被修改了',newValue,oldValue)
					}
				}, */
				//简写
				/* isHot(newValue,oldValue){
					console.log('isHot被修改了',newValue,oldValue,this)
				} */
			}
		})

		//正常写法
		/* vm.$watch('isHot',{
			immediate:true, //初始化时让handler调用一下
			deep:true,//深度监视
			handler(newValue,oldValue){
				console.log('isHot被修改了',newValue,oldValue)
			}
		}) */

		//简写
		/* vm.$watch('isHot',(newValue,oldValue)=>{
			console.log('isHot被修改了',newValue,oldValue,this)
		}) */

	</script>
computed和watch之间的区别
- computed能完成的功能,watch都可以完成。
- watch能完成的功能,computed不一定能完成,例如:watch可以进行异步操作
- 两个重要的小原则:
- 所被Vue管理的函数,最好写成普通函数,这样this的指向才是vm或组件实例对象
- 所有不被Vue所管理的函数(定时器的回调函数、ajax的回调函数等),最好写成箭头函数,这样this的指向才是vm或组件实例对象。
style与class样式绑定
-
c1ass样式
- 写法 :class="xxx" xxx可以是 字符串、对象、数组。
- 字符串写法适用于:类名不确定,要动态获取。
- 对象写法适用于:要绑定多个样式,个数不确定,名字也不确定。
- 数组写法适用于:要绑定多个样式,个数确定,名字也确定,但不确定用不用。
<!DOCTYPE html>
<html>
	<head>
		<meta charset="UTF-8" />
		<title>绑定样式</title>
		<style>
			.basic{
				width: 400px;
				height: 100px;
				border: 1px solid black;
			}

			.happy{
				border: 4px solid red;;
				background-color: rgba(255, 255, 0, 0.644);
				background: linear-gradient(30deg,yellow,pink,orange,yellow);
			}
			.sad{
				border: 4px dashed rgb(2, 197, 2);
				background-color: gray;
			}
			.normal{
				background-color: skyblue;
			}

			.test1{
				background-color: yellowgreen;
			}
			.test2{
				font-size: 30px;
				text-shadow:2px 2px 10px red;
			}
			.test3{
				border-radius: 20px;
			}
		</style>
		<script type="text/javascript" src="../js/vue.js"></script>
	</head>
	<body>
		<!-- 准备好一个容器-->
		<div id="root">
			<!-- 绑定class样式--字符串写法,适用于:样式的类名不确定,需要动态指定 -->
			<div class="basic" :class="mood" @click="changeMood"></div> <br/><br/>

			<!-- 绑定class样式--数组写法,适用于:要绑定的样式个数不确定、名字也不确定 -->
			<div class="basic" :class="classArr"></div> <br/><br/>

			<!-- 绑定class样式--对象写法,适用于:要绑定的样式个数确定、名字也确定,但要动态决定用不用 -->
			<div class="basic" :class="classObj"></div> <br/><br/>

			<!-- 绑定style样式--对象写法 -->
			<div class="basic" :style="styleObj"></div> <br/><br/>
			<!-- 绑定style样式--数组写法 -->
			<div class="basic" :style="styleArr"></div>
		</div>
	</body>

	<script type="text/javascript">
		Vue.config.productionTip = false

		const vm = new Vue({
			el:'#root',
			data:{
				name:'test',
				mood:'normal',
				classArr:['test1','test2','test3'],
				classObj:{
					test1:false,
					test2:false,
				},
				styleObj:{
					fontSize: '40px',
					color:'red',
				},
				styleObj2:{
					backgroundColor:'orange'
				},
				styleArr:[
					{
						fontSize: '40px',
						color:'blue',
					},
					{
						backgroundColor:'gray'
					}
				]
			},
			methods: {
				changeMood(){
					const arr = ['happy','sad','normal']
					const index = Math.floor(Math.random()*3)
					this.mood = arr[index]
				}
			},
		})
	</script>

</html>
-
style样式
- :sty1e="{fontsize:xxx}"其中xxx是动态值。
- :style="[a,b]"其中a、b是样式对象。
条件渲染
-
v-if
-
写法:
- v- if="表达式
- v- e1se-if="表达式"
- v- else="表达式"
-
适用于:切换频率较低的场景。
-
特点:不展示的DOM元素直接被移除。
-
注意:v-if可以和:v-else-if、v-else一起使用,但要求结构不能被“打断”。
-
-
v-show
- 写法:V-show="表达式”
- 适用于:切换频率较高的场景。
- 特点:不展示的DOM元素未被移除,仅仅是使用样式隐藏掉
- 3.备注:使用v-if的时,元素可能无法获取到,而使用v-show一定可以获取到。
列表渲染
基本列表
- v-for指令:
- 用于展示列表数据
- 语法:
v-for="(item,index)in xxx":key="yyy" - 可遍历:数组、对象、字符串(用的很少)、指定次数(用的很少)
<html>
	<head>
		<meta charset="UTF-8" />
		<title>基本列表</title>
		<script type="text/javascript" src="../js/vue.js"></script>
	</head>
	<body>
		<!-- 准备好一个容器-->
		<div id="root">
			<!-- 遍历数组 -->
			<h2>人员列表(遍历数组)</h2>
			<ul>
				<li v-for="(p,index) of persons" :key="index">
					-
				</li>
			</ul>

			<!-- 遍历对象 -->
			<h2>汽车信息(遍历对象)</h2>
			<ul>
				<li v-for="(value,k) of car" :key="k">
					-
				</li>
			</ul>

			<!-- 遍历字符串 -->
			<h2>测试遍历字符串(用得少)</h2>
			<ul>
				<li v-for="(char,index) of str" :key="index">
					-
				</li>
			</ul>

			<!-- 遍历指定次数 -->
			<h2>测试遍历指定次数(用得少)</h2>
			<ul>
				<li v-for="(number,index) of 5" :key="index">
					-
				</li>
			</ul>
		</div>

		<script type="text/javascript">
			Vue.config.productionTip = false

			new Vue({
				el:'#root',
				data:{
					persons:[
						{id:'001',name:'张三',age:18},
						{id:'002',name:'李四',age:19},
						{id:'003',name:'王五',age:20}
					],
					car:{
						name:'奥迪A8',
						price:'70万',
						color:'黑色'
					},
					str:'hello'
				}
			})
		</script>
</html>
key的原理
-
虚拟DOM中key的作用:
- key是虚拟DoM对象的标识,当状态中的数据发生变化时,Vue会根据【新数据】生成【新的虚拟DOM】,
- 随后Vue进行【新虚拟DOM】与【旧虚拟DOM】的差异比较,比较规则如下:
-
对比规则:
-
旧虚拟DOM中找到了与新虚拟DOM相同的key:
- 若虚拟DOM中内容没变,直接使用之前的真实DOM!
- 若虚拟DOM中内容变了,则生成新的真实DOM,随后替换掉页面中之前的真实DOM。
-
虚拟DOM中未找到与新虚拟DOM相同的key创建新的真实DOM,随后渲染到到页面。
-
-
用index作为key可能会引发的问题:
- 若对数据进行:逆序添加、逆序删除等破坏顺序操作:会产生没有必要的真实DOM更新==>界面效果没问题,但效率低。
- 如果结构中还包含输入类的DOM:会产生错误DOM更新=>界面有问题。
-
开发中如何选择key?:
- 最好使用每条数据的唯一标识作为key,比如id、手机号、身份证号、学号等唯一值。
- 如果不存在对数据的逆序添加、逆序删除等破坏顺序操作,仅用于渲染列表用于展示,使用index作为key是没有问题的。
收集表单数据
-
若:
<input type="text"/>,则v-model收集的是value值,用户输入的就是value值。 -
若:
<input type:="radio"/>,则v-model收集的是value值,且要给标签配置value值。 -
若:
<input type="checkbox"/>-
没有配置input的value属性,那么收集的就是checked(勾选or未勾选,是布尔值)
-
配置input的value属性:
- v-model的初始值是非数组,那么收集的就是checked(勾选or未勾选,是布尔值)
- v-model的初始值是数组,那么收集的的就是value组成的数组
-
-
备注:v-model的三个修饰符:
- lazy:失去焦点再收集数据
- number:输入字符串转为有效的数字
- trim:输入首尾空格过滤
生命周期
-
生命周期引入
- 又名:生命周期回调函数、生命周期函数、生命周期钩子。
- 是什么:Vue在关键时刻帮我们调用的一些特殊名称的函数。
- 生命周期函数的名字不可更改,但函数的具体内容是程序员根据需求编写的。
- 生命周期函数中的this指向是vm或组件实例对象。
-
挂载流程
组件
非单文件组件
使用组件的三大步骤
-
一、定义组件(创建组件)
-
如何定义一个组件?
- 使用Vue.extend(options)创建,其中options和new Vue(options)时传入的那个options几乎一样,但也有点区别,区别如下:
- e1不要写,为什么?一最终所有的组件都要经过一个vm的管理,由vm中的el决定服务哪个容器。
- data必须写成函数,为什么?避免组件被复用时,数据存在引用关系。
- 备注:使用template可以配置组件结构。
- 使用Vue.extend(options)创建,其中options和new Vue(options)时传入的那个options几乎一样,但也有点区别,区别如下:
-
-
二、注册组件
-
如何注册组件?
- 局部注册:靠new Vue的时候传入components选项
- 全局注册:靠Vue.component('组件名',组件)
-
-
三、使用组件(写组件标签)
-
编写组件标签:
<school></school>
-
几个注意点
-
关于组件名:
-
一个单词组成:
- 第一种写法(首字母小写):school
- 第二种写法(首字母大写):School
-
多个单词组成:
- 第一种写法(kebab-case命名):my-school
- 第二种写法(CamelCase命名):MySchoo1(需要Vue脚手架支持)
-
备注:
- 组件名尽可能回避HTML中已有的元素名称,例如:h2、H2都不行。
- 可以使用name配置项指定组件在开发者工具中呈现的名字。
-
-
关于组件标签:
- 第一种写法:
<school></school> - 第二种写法:
<school/> - 备注:不用使用脚手架时,
会导致后续组件不能渲染。
- 第一种写法:
-
一个简写方式:
const school=Vue.extend(options)可简写为:const school=options
组件的嵌套
- 在父组件的components中注册 在父组件的template中使用
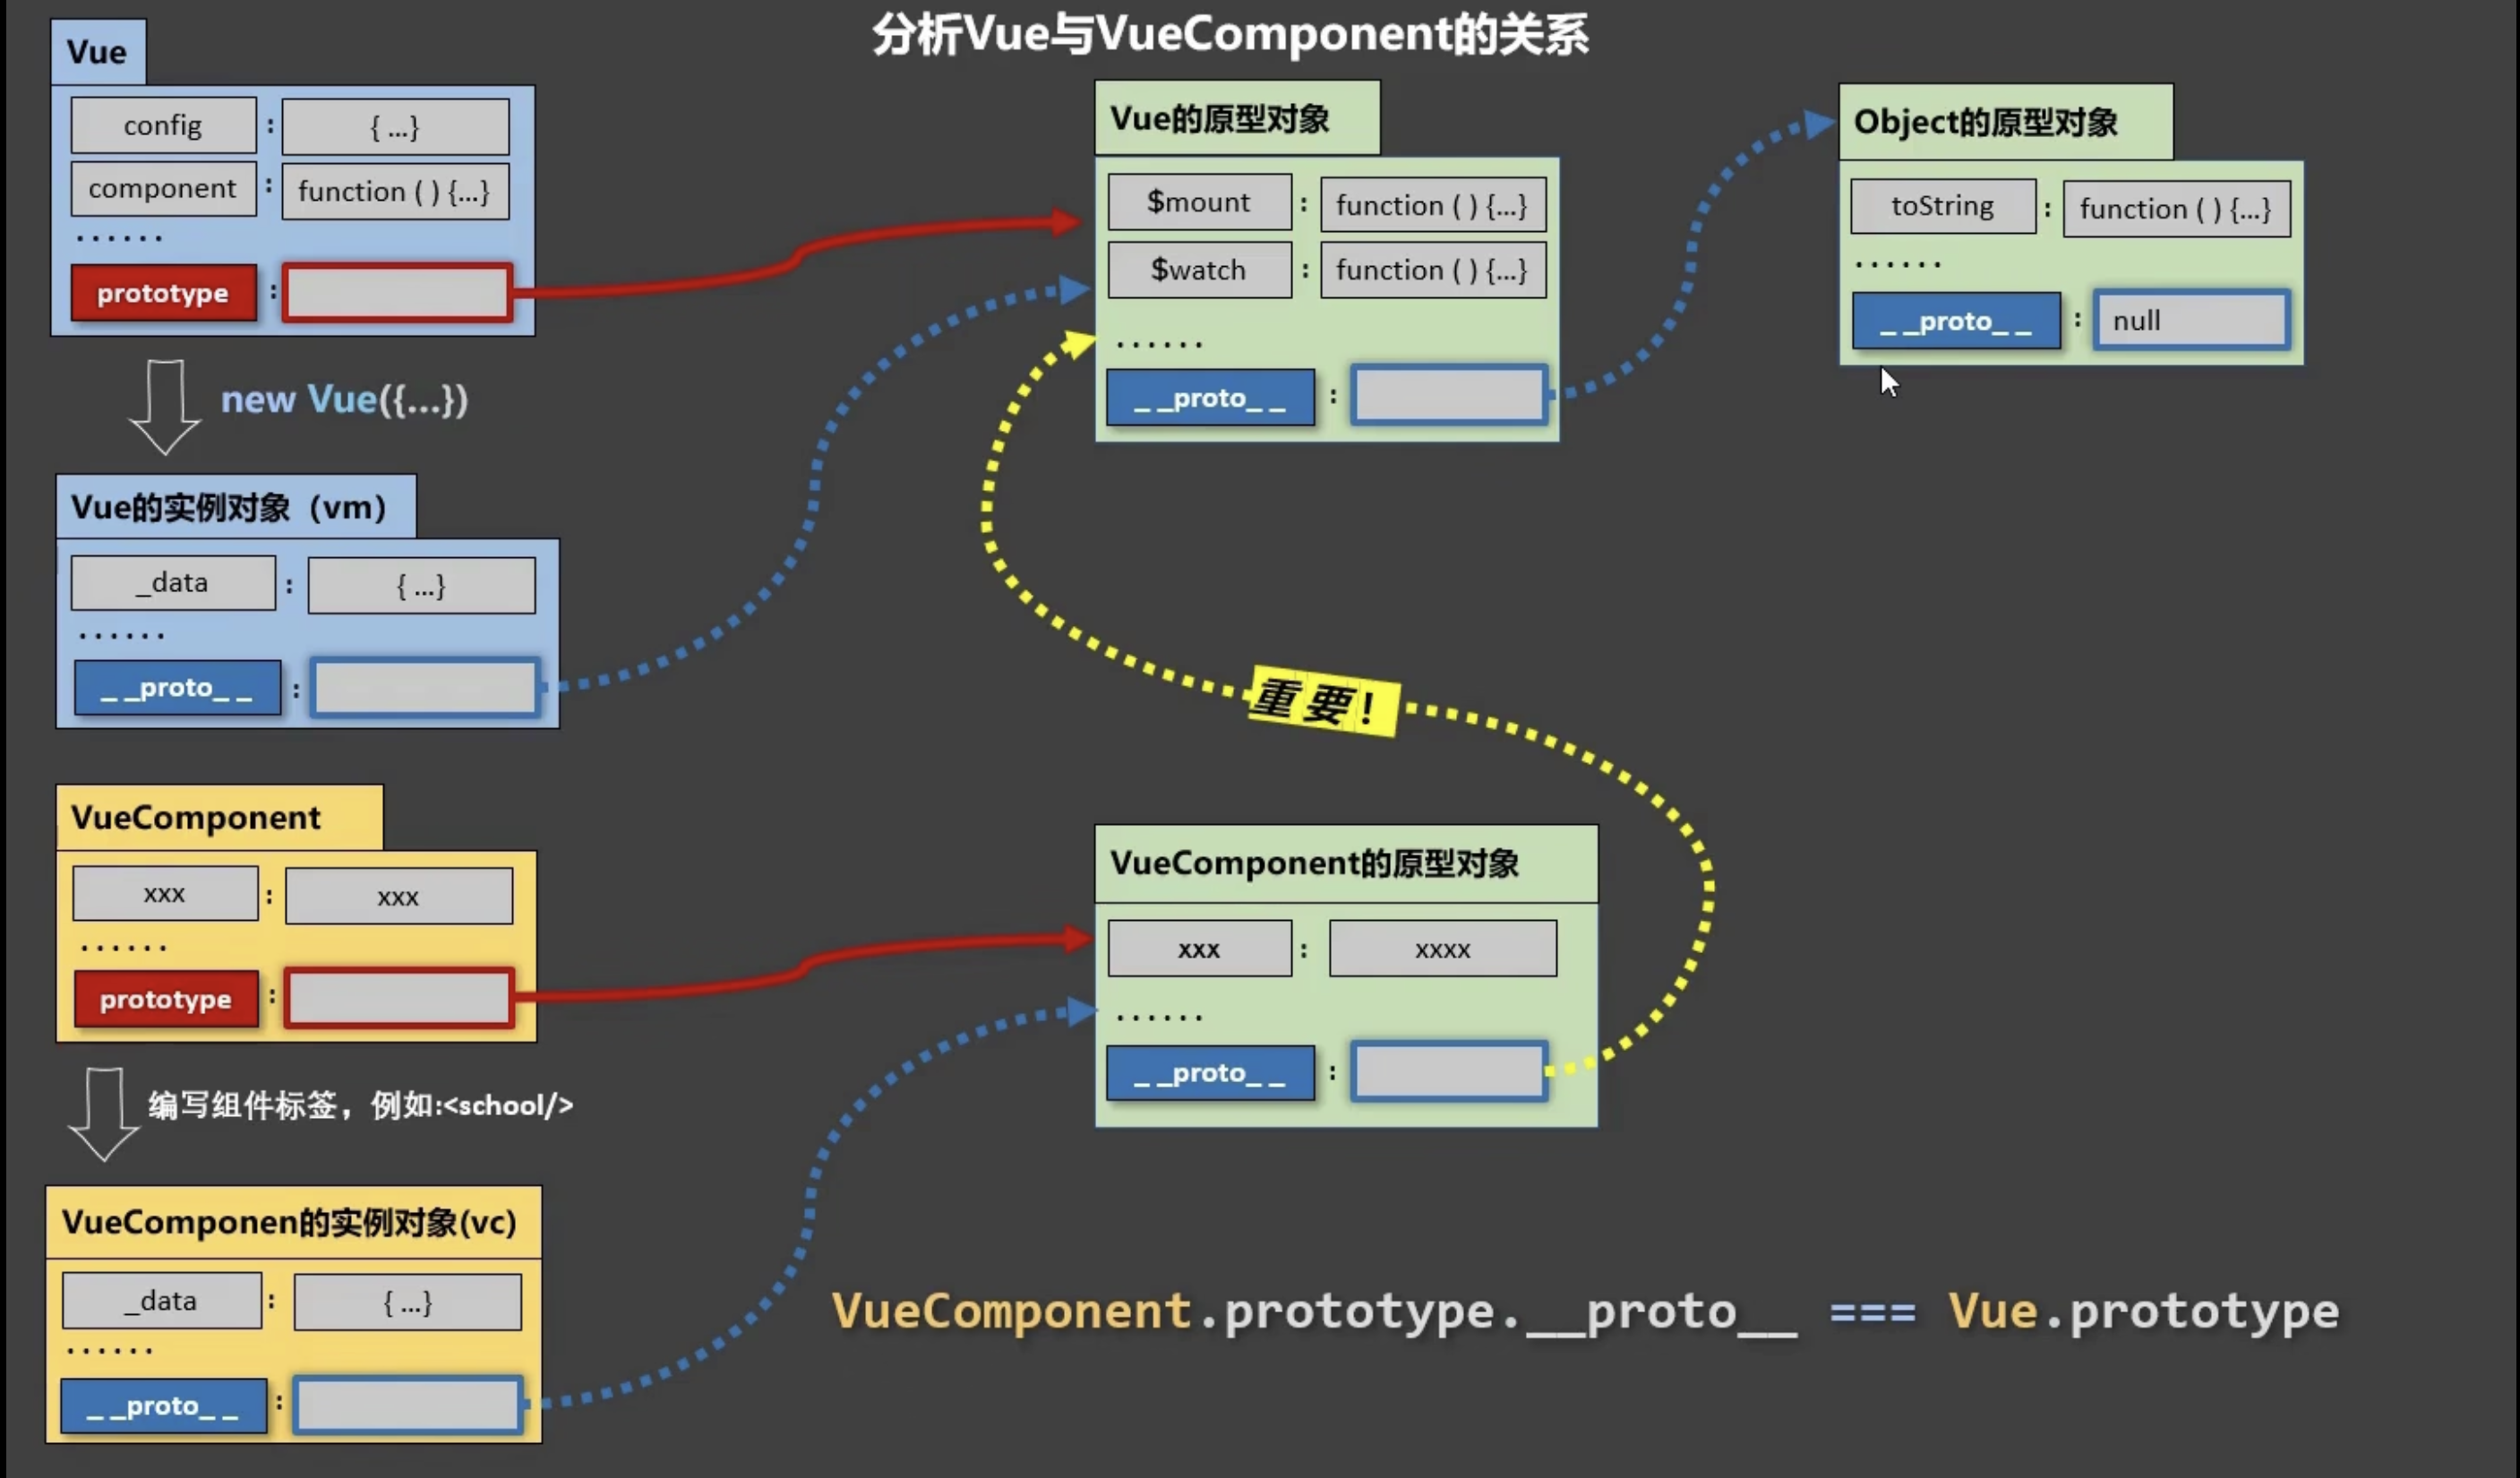
关于VueComponent:
-
school组件本质是一个名为VueComponent的构造函数,且不是程序员定义的,是Vue.extend生成的
-
只需要写<school/>或<school></school>,Vue解析时会创建school组件的实例对象,即Vue执行:new VueComponent(options)
-
特别注意:每次调用Vue.extend,返回的都是一个全新的VueComponent
-
关于this指向:
-
组件配置中:
- data函数、methods中的函数、watch中的函数、computed中的函数它们的this均是【VueComponent:实例对象】
-
new Vue(options)配置中:
- data函数、methods中的函数、watch中的函数、computed中的函数它们的this均是【Vue实例对象】。
-
-
VueComponent的实例对象,简称vc(也可称之为:组件实例对象) Vue的实例对象,简称vm。
- 思考vm实例和vc实例的异同
一个重要的内置关系
- VC.prototype.__proto__ === Vue.prototype
- 原型链相关知识
单文件组件
基本写法
Vue-CLI(脚手架)
- Command Line Interface
- CLI结构
render函数
ref属性
ref
Expects: string
ref is used to register a reference to an element or a child component. The reference will be registered under the parent component’s $refs object. If used on a plain DOM element, the reference will be that element; if used on a child component, the reference will be component instance:
<!-- vm.$refs.p will be the DOM node -->
<p ref="p">hello</p>

<!-- vm.$refs.child will be the child component instance -->
<child-component ref="child"></child-component>
When used on elements/components with v-for, the registered reference will be an Array containing DOM nodes or component instances.

An important note about the ref registration timing: because the refs themselves are created as a result of the render function, you cannot access them on the initial render - they don’t exist yet! $refs is also non-reactive, therefore you should not attempt to use it in templates for data-binding.
props配置
用于父组件传递数据给子组件
props 即属性
子组件中:
export default {
		name:'Student',
		data() {
			console.log(this)
			return {
				msg:'我是学生',
				myAge:this.age
			}
		},
		methods: {
			updateAge(){
				this.myAge++
			}
		},
		//简单声明接收
		// props:['name','age','sex']

		//接收的同时对数据进行类型限制
		/* props:{
			name:String,
			age:Number,
			sex:String
		} */

		//接收的同时对数据:进行类型限制+默认值的指定+必要性的限制
		props:{
			name:{
				type:String, //name的类型是字符串
				required:true, //name是必要的
			},
			age:{
				type:Number,
				default:99 //默认值
			},
			sex:{
				type:String,
				required:true
			}
		}
	}
父组件中使用:
<template>
	<div>
		<Student name="李四" sex="女" :age="18"/>
	</div>
</template>
Mixins
Basics
Mixins are a flexible way to distribute reusable functionalities for Vue components. A mixin object can contain any component options. When a component uses a mixin, all options in the mixin will be “mixed” into the component’s own options.
Example :
// define a mixin object
var myMixin = {
  created: function () {
    this.hello()
  },
  methods: {
    hello: function () {
      console.log('hello from mixin!')
    }
  }
}

// define a component that uses this mixin
var Component = Vue.extend({
  mixins: [myMixin]
})

var component = new Component() // => "hello from mixin!"
Option Merging
When a mixin and the component itself contain overlapping options, they will be “merged” using appropriate strategies.
For example, data objects undergo a recursive merge, with the component’s data taking priority in cases of conflicts.
var mixin = {
  data: function () {
    return {
      message: 'hello',
      foo: 'abc'
    }
  }
}

new Vue({
  mixins: [mixin],
  data: function () {
    return {
      message: 'goodbye',
      bar: 'def'
    }
  },
  created: function () {
    console.log(this.$data)
    // => { message: "goodbye", foo: "abc", bar: "def" }
  }
})
Hook functions with the same name are merged into an array so that all of them will be called.Mixin hooks will be called before the component’s own hooks.
var mixin = {
  created: function () {
    console.log('mixin hook called')
  }
}

new Vue({
  mixins: [mixin],
  created: function () {
    console.log('component hook called')
  }
})

// => "mixin hook called"
// => "component hook called"
Options that expect object values, for example methods, components and directives, will be merged into the same object. The component’s options will take priority when there are conflicting keys in these objects:
var mixin = {
  methods: {
    foo: function () {
      console.log('foo')
    },
    conflicting: function () {
      console.log('from mixin')
    }
  }
}

var vm = new Vue({
  mixins: [mixin],
  methods: {
    bar: function () {
      console.log('bar')
    },
    conflicting: function () {
      console.log('from self')
    }
  }
})

vm.foo() // => "foo"
vm.bar() // => "bar"
vm.conflicting() // => "from self"
Note that the same merge strategies are used in Vue.extend().
Global Mixin
You can also apply a mixin globally. Use with caution! Once you apply a mixin globally, it will affect every Vue instance created afterwards. When used properly, this can be used to inject processing logic for custom options:
// inject a handler for `myOption` custom option
Vue.mixin({
  created: function () {
    var myOption = this.$options.myOption
    if (myOption) {
      console.log(myOption)
    }
  }
})

new Vue({
  myOption: 'hello!'
})
// => "hello!"
Use global mixins sparsely and carefully, because it affects every single Vue instance created, including third party components. In most cases, you should only use it for custom option handling like demonstrated in the example above. It’s also a good idea to ship them as Plugins to avoid duplicate application.
Custom Option Merge Strategies
When custom options are merged, they use the default strategy which overwrites the existing value. If you want a custom option to be merged using custom logic, you need to attach a function to Vue.config.optionMergeStrategies:
Vue.config.optionMergeStrategies.myOption = function (toVal, fromVal) {
  // return mergedVal
}
For most object-based options, you can use the same strategy used by methods:
var strategies = Vue.config.optionMergeStrategies
strategies.myOption = strategies.methods
A more advanced example can be found on Vuex's 1.x merging strategy:
const merge = Vue.config.optionMergeStrategies.computed
Vue.config.optionMergeStrategies.vuex = function (toVal, fromVal) {
  if (!toVal) return fromVal
  if (!fromVal) return toVal
  return {
    getters: merge(toVal.getters, fromVal.getters),
    state: merge(toVal.state, fromVal.state),
    actions: merge(toVal.actions, fromVal.actions)
  }
}
Custom Directives
Intro
In addition to the default set of directives shipped in core (v-model and v-show), Vue also allows you to register your own custom directives. Note that in Vue 2.0, the primary form of code reuse and abstraction is components - however there may be cases where you need some low-level DOM access on plain elements, and this is where custom directives would still be useful. An example would be focusing on an input element, like this one:
When the page loads, that element gains focus (note: autofocus doesn’t work on mobile Safari). In fact, if you haven’t clicked on anything else since visiting this page, the input above should be focused now. Now let’s build the directive that accomplishes this:
// Register a global custom directive called `v-focus`
Vue.directive('focus', {
  // When the bound element is inserted into the DOM...
  inserted: function (el) {
    // Focus the element
    el.focus()
  }
})
If you want to register a directive locally instead, components also accept a directives option:
directives: {
  focus: {
    // directive definition
    inserted: function (el) {
      el.focus()
    }
  }
}
Then in a template, you can use the new v-focus attribute on any element, like this:
<input v-focus>
Hook Functions
A directive definition object can provide several hook functions (all optional):
-
bind: called only once, when the directive is first bound to the element. This is where you can do one-time setup work. -
inserted: called when the bound element has been inserted into its parent node (this only guarantees parent node presence, not necessarily in-document). -
update: called after the containing component’s VNode has updated, but possibly before its children have updated. The directive’s value may or may not have changed, but you can skip unnecessary updates by comparing the binding’s current and old values (see below on hook arguments).
We’ll cover VNodes in more detail later, when we discuss render functions.
-
componentUpdated: called after the containing component’s VNode and the VNodes of its children have updated. -
unbind: called only once, when the directive is unbound from the element.
We’ll explore the arguments passed into these hooks (i.e. el, binding, vnode, and oldVnode) in the next section.
Directive Hook Arguments
Directive hooks are passed these arguments:
el: The element the directive is bound to. This can be used to directly manipulate the DOM.binding: An object containing the following properties.name: The name of the directive, without thev-prefix.value: The value passed to the directive. For example inv-my-directive="1 + 1", the value would be2.oldValue: The previous value, only available inupdateandcomponentUpdated. It is available whether or not the value has changed.expression: The expression of the binding as a string. For example inv-my-directive="1 + 1", the expression would be"1 + 1".arg: The argument passed to the directive, if any. For example in v-my-directive:foo, the arg would be "foo".modifiers: An object containing modifiers, if any. For example inv-my-directive.foo.bar, the modifiers object would be{ foo: true, bar: true }.
vnode: The virtual node produced by Vue’s compiler. See the VNode API for full details.oldVnode: The previous virtual node, only available in theupdateandcomponentUpdatedhooks.
Apart from
el, you should treat these arguments as read-only and never modify them. If you need to share information across hooks, it is recommended to do so through element’s dataset.
An example of a custom directive using some of these properties:
<div id="hook-arguments-example" v-demo:foo.a.b="message"></div>
Vue.directive('demo', {
  bind: function (el, binding, vnode) {
    var s = JSON.stringify
    el.innerHTML =
      'name: '       + s(binding.name) + '<br>' +
      'value: '      + s(binding.value) + '<br>' +
      'expression: ' + s(binding.expression) + '<br>' +
      'argument: '   + s(binding.arg) + '<br>' +
      'modifiers: '  + s(binding.modifiers) + '<br>' +
      'vnode keys: ' + Object.keys(vnode).join(', ')
  }
})

new Vue({
  el: '#hook-arguments-example',
  data: {
    message: 'hello!'
  }
})
Dynamic Directive Arguments
Directive arguments can be dynamic. For example, in v-mydirective:[argument]="value", the argument can be updated based on data properties in our component instance! This makes our custom directives flexible for use throughout our application.
Let’s say you want to make a custom directive that allows you to pin elements to your page using fixed positioning. We could create a custom directive where the value updates the vertical positioning in pixels, like this:
<div id="baseexample">
  <p>Scroll down the page</p>
  <p v-pin="200">Stick me 200px from the top of the page</p>
</div>
Vue.directive('pin', {
  bind: function (el, binding, vnode) {
    el.style.position = 'fixed'
    el.style.top = binding.value + 'px'
  }
})

new Vue({
  el: '#baseexample'
})
This would pin the element 200px from the top of the page. But what happens if we run into a scenario when we need to pin the element from the left, instead of the top? Here’s where a dynamic argument that can be updated per component instance comes in very handy:
<div id="dynamicexample">
  <h3>Scroll down inside this section ↓</h3>
  <p v-pin:[direction]="200">I am pinned onto the page at 200px to the left.</p>
</div>
Vue.directive('pin', {
  bind: function (el, binding, vnode) {
    el.style.position = 'fixed'
    var s = (binding.arg == 'left' ? 'left' : 'top')
    el.style[s] = binding.value + 'px'
  }
})

new Vue({
  el: '#dynamicexample',
  data: function () {
    return {
      direction: 'left'
    }
  }
})
Our custom directive is now flexible enough to support a few different use cases.
Function Shorthand
In many cases, you may want the same behavior on bind and update, but don’t care about the other hooks. For example:
Vue.directive('color-swatch', function (el, binding) {
  el.style.backgroundColor = binding.value
})
Object Literals
If your directive needs multiple values, you can also pass in a JavaScript object literal. Remember, directives can take any valid JavaScript expression.
<div v-demo="{ color: 'white', text: 'hello!' }"></div>
Vue.directive('demo', function (el, binding) {
  console.log(binding.value.color) // => "white"
  console.log(binding.value.text)  // => "hello!"
})
Plugins
Plugins usually add global-level functionality to Vue. There is no strictly defined scope for a plugin - there are typically several types of plugins:
-
Add some global methods or properties. e.g. vue-custom-element
-
Add one or more global assets: directives/filters/transitions etc. e.g. vue-touch
-
Add some component options by global mixin. e.g. vue-router
-
Add some Vue instance methods by attaching them to Vue.prototype.
-
A library that provides an API of its own, while at the same time injecting some combination of the above. e.g. vue-router
Using a Plugin
Use plugins by calling the Vue.use() global method. This has to be done before you start your app by calling new Vue():
// calls `MyPlugin.install(Vue)`
Vue.use(MyPlugin)

new Vue({
  //... options
})
You can optionally pass in some options:
Vue.use(MyPlugin, { someOption: true })
Vue.use automatically prevents you from using the same plugin more than once, so calling it multiple times on the same plugin will install the plugin only once.
Some plugins provided by Vue.js official plugins such as vue-router automatically calls Vue.use() if Vue is available as a global variable. However in a module environment such as CommonJS, you always need to call Vue.use() explicitly:
// When using CommonJS via Browserify or Webpack
var Vue = require('vue')
var VueRouter = require('vue-router')

// Don't forget to call this
Vue.use(VueRouter)
Checkout awesome-vue for a huge collection of community-contributed plugins and libraries.
Writing a Plugin
A Vue.js plugin should expose an install method. The method will be called with the Vue constructor as the first argument, along with possible options:
MyPlugin.install = function (Vue, options) {
  // 1. add global method or property
  Vue.myGlobalMethod = function () {
    // some logic ...
  }

  // 2. add a global asset
  Vue.directive('my-directive', {
    bind (el, binding, vnode, oldVnode) {
      // some logic ...
    }
    ...
  })

  // 3. inject some component options
  Vue.mixin({
    created: function () {
      // some logic ...
    }
    ...
  })

  // 4. add an instance method
  Vue.prototype.$myMethod = function (methodOptions) {
    // some logic ...
  }
}
scoped样式
使CSS只对当前组件生效 避免类名同名带来的麻烦
Custom Events
Event Names
Unlike components and props, event names don’t provide any automatic case transformation. Instead, the name of an emitted event must exactly match the name used to listen to that event. For example, if emitting a camelCased event name:
this.$emit('myEvent')
Listening to the kebab-cased version will have no effect:
<!-- Won't work -->
<my-component v-on:my-event="doSomething"></my-component>
Unlike components and props, event names will never be used as variable or property names in JavaScript, so there’s no reason to use camelCase or PascalCase. Additionally, v-on event listeners inside DOM templates will be automatically transformed to lowercase (due to HTML’s case-insensitivity), so v-on:myEvent would become v-on:myevent – making myEvent impossible to listen to.
For these reasons, we recommend you always use kebab-case for event names.
Customizing Component v-model
By default, v-model on a component uses value as the prop and input as the event, but some input types such as checkboxes and radio buttons may want to use the value attribute for a different purpose. Using the model option can avoid a conflict in such cases:
Vue.component('base-checkbox', {
  model: {
    prop: 'checked',
    event: 'change'
  },
  props: {
    checked: Boolean
  },
  template: `
    <input
      type="checkbox"
      v-bind:checked="checked"
      v-on:change="$emit('change', $event.target.checked)"
    >
  `
})
Now when using v-model on this component:
<base-checkbox v-model="lovingVue"></base-checkbox>
the value of lovingVue will be passed to the checked prop. The lovingVue property will then be updated when <base-checkbox> emits a change event with a new value.
Note that you still have to declare the
checkedprop in the component’spropsoption.
Binding Native Events to Components
There may be times when you want to listen directly to a native event on the root element of a component. In these cases, you can use the .native modifier for v-on:
<base-input v-on:focus.native="onFocus"></base-input>
This can be useful sometimes, but it’s not a good idea when you’re trying to listen on a very specific element, like an <input>. For example, the <base-input>component above might refactor so that the root element is actually a <label> element:
<label>

  <input
    v-bind="$attrs"
    v-bind:value="value"
    v-on:input="$emit('input', $event.target.value)"
  >
</label>
In that case, the .native listener in the parent would silently break. There would be no errors, but the onFocus handler wouldn’t be called when we expected it to.
To solve this problem, Vue provides a $listeners property containing an object of listeners being used on the component. For example:
{
  focus: function (event) { /* ... */ }
  input: function (value) { /* ... */ },
}
Using the $listeners property, you can forward all event listeners on the component to a specific child element with v-on="$listeners". For elements like <input>, that you also want to work with v-model, it’s often useful to create a new computed property for listeners, like inputListeners below:
Vue.component('base-input', {
  inheritAttrs: false,
  props: ['label', 'value'],
  computed: {
    inputListeners: function () {
      var vm = this
      // `Object.assign` merges objects together to form a new object
      return Object.assign({},
        // We add all the listeners from the parent
        this.$listeners,
        // Then we can add custom listeners or override the
        // behavior of some listeners.
        {
          // This ensures that the component works with v-model
          input: function (event) {
            vm.$emit('input', event.target.value)
          }
        }
      )
    }
  },
  template: `
    <label>

      <input
        v-bind="$attrs"
        v-bind:value="value"
        v-on="inputListeners"
      >
    </label>
  `
})
Now the <base-input> component is a fully transparent wrapper, meaning it can be used exactly like a normal <input> element: all the same attributes and listeners will work, without the .native modifier.
.sync Modifier
In some cases, we may need “two-way binding” for a prop. Unfortunately, true two-way binding can create maintenance issues, because child components can mutate the parent without the source of that mutation being obvious in both the parent and the child.
That’s why instead, we recommend emitting events in the pattern of update:myPropName. For example, in a hypothetical component with a title prop, we could communicate the intent of assigning a new value with:
this.$emit('update:title', newTitle)
Then the parent can listen to that event and update a local data property, if it wants to. For example:
<text-document
  v-bind:title="doc.title"
  v-on:update:title="doc.title = $event"
></text-document>
For convenience, we offer a shorthand for this pattern with the .sync modifier:
<text-document v-bind:title.sync="doc.title"></text-document>
Note that
v-bindwith the.syncmodifier does not work with expressions (e.g. v-bind:title.sync=”doc.title + ‘!’” is invalid). Instead, you must only provide the name of the property you want to bind, similar tov-model.
The .sync modifier can also be used with v-bind when using an object to set multiple props at once:
<text-document v-bind.sync="doc"></text-document>
This passes each property in the doc object (e.g. title) as an individual prop, then adds v-on update listeners for each one.
Using
v-bind.syncwith a literal object, such as inv-bind.sync="{ title: doc.title }", will not work, because there are too many edge cases to consider in parsing a complex expression like this.
全局事件总线
new Vue({
	el:'#app',
	render: h => h(App),
	beforeCreate() {
		Vue.prototype.$bus = this //安装全局事件总线
	},
})
Slots
Slot Content
Vue implements a content distribution API inspired by the Web Components spec draft, using the <\slot> element to serve as distribution outlets for content.
This allows you to compose components like this:
<navigation-link url="/profile">
  Your Profile
</navigation-link>
Then in the template for <navigation-link>, you might have:

<a
  v-bind:href="url"
  class="nav-link"
>
  <slot></slot>
</a>
When the component renders, <slot></slot> will be replaced by “Your Profile”. Slots can contain any template code, including HTML:
<navigation-link url="/profile">
  <!-- Add a Font Awesome icon -->
  <span class="fa fa-user"></span>
  Your Profile
</navigation-link>
Or even other components:

<navigation-link url="/profile">
  <!-- Use a component to add an icon -->
  <font-awesome-icon name="user"></font-awesome-icon>
  Your Profile
</navigation-link>
If <navigation-link>'s template did not contain a <slot> element, any content provided between its opening and closing tag would be discarded.
Compilation Scope
When you want to use data inside a slot, such as in:
<navigation-link url="/profile">
  Logged in as
</navigation-link>
That slot has access to the same instance properties (i.e. the same “scope”) as the rest of the template. The slot does not have access to <navigation-link>‘s scope. For example, trying to access url would not work:

<navigation-link url="/profile">
  Clicking here will send you to:
  <!--
  The `url` will be undefined, because this content is passed
  _to_ <navigation-link>, rather than defined _inside_ the
  <navigation-link> component.
  -->
</navigation-link>
As a rule, remember that:
Everything in the parent template is compiled in parent scope; everything in the child template is compiled in the child scope.
Fallback Content
There are cases when it’s useful to specify fallback (i.e. default) content for a slot, to be rendered only when no content is provided. For example, in a 1<submit-button>1 component:
<button type="submit">
  <slot></slot>
</button>
We might want the text “Submit” to be rendered inside the <button> most of the time. To make “Submit” the fallback content, we can place it in between the <slot> tags:
<button type="submit">
  <slot>Submit</slot>
</button>
Now when we use <submit-button> in a parent component, providing no content for the slot:
<submit-button></submit-button>
will render the fallback content, “Submit”:
<button type="submit">
  Submit
</button>
But if we provide content:
<submit-button>
  Save
</submit-button>
Then the provided content will be rendered instead:
<button type="submit">
  Save
</button>
Named Slots
There are times when it’s useful to have multiple slots. For example, in a <base-layout> component with the following template:
<div class="container">
  <header>
    <!-- We want header content here -->
  </header>
  <main>
    <!-- We want main content here -->
  </main>
  <footer>
    <!-- We want footer content here -->
  </footer>
</div>
For these cases, the <slot> element has a special attribute, name, which can be used to define additional slots:
<div class="container">
  <header>
    <slot name="header"></slot>
  </header>
  <main>
    <slot></slot>
  </main>
  <footer>
    <slot name="footer"></slot>
  </footer>
</div>
A <slot>outlet without name implicitly has the name “default”.
To provide content to named slots, we can use the v-slot directive on a <template>, providing the name of the slot as v-slot's argument:
<base-layout>
  <template v-slot:header>
    <h1>Here might be a page title</h1>
  </template>

  <p>A paragraph for the main content.</p>
  <p>And another one.</p>

  <template v-slot:footer>
    <p>Here's some contact info</p>
  </template>
</base-layout>
Now everything inside the <template> elements will be passed to the corresponding slots. Any content not wrapped in a <template>using v-slot is assumed to be for the default slot.
However, you can still wrap default slot content in a <template> if you wish to be explicit:
<base-layout>
  <template v-slot:header>
    <h1>Here might be a page title</h1>
  </template>

  <template v-slot:default>
    <p>A paragraph for the main content.</p>
    <p>And another one.</p>
  </template>

  <template v-slot:footer>
    <p>Here's some contact info</p>
  </template>
</base-layout>
Either way, the rendered HTML will be:
<div class="container">
  <header>
    <h1>Here might be a page title</h1>
  </header>
  <main>
    <p>A paragraph for the main content.</p>
    <p>And another one.</p>
  </main>
  <footer>
    <p>Here's some contact info</p>
  </footer>
</div>
Note that v-slot can only be added to a<template> (with one exception), unlike the deprecated slot attribute.
Scoped Slots
Sometimes, it’s useful for slot content to have access to data only available in the child component. For example, imagine a <current-user> component with the following template:
<span>
  <slot></slot>
</span>
We might want to replace this fallback content to display the user’s first name, instead of last, like this:
<current-user>

</current-user>
That won’t work, however, because only the <current-user> component has access to the user and the content we’re providing is rendered in the parent.
To make user available to the slot content in the parent, we can bind user as an attribute to the <slot> element:
<span>
  <slot v-bind:user="user">

  </slot>
</span>
Attributes bound to a <slot> element are called slot props. Now, in the parent scope, we can use v-slot with a value to define a name for the slot props we’ve been provided:
<current-user>
  <template v-slot:default="slotProps">

  </template>
</current-user>
In this example, we’ve chosen to name the object containing all our slot props slotProps, but you can use any name you like.
Abbreviated Syntax for Lone Default Slots
In cases like above, when only the default slot is provided content, the component’s tags can be used as the slot’s template. This allows us to use v-slot directly on the component:
<current-user v-slot:default="slotProps">

</current-user>
This can be shortened even further. Just as non-specified content is assumed to be for the default slot, v-slot without an argument is assumed to refer to the default slot:
<current-user v-slot="slotProps">

</current-user>
Note that the abbreviated syntax for default slot cannot be mixed with named slots, as it would lead to scope ambiguity:
<!-- INVALID, will result in warning -->
<current-user v-slot="slotProps">

  <template v-slot:other="otherSlotProps">
    slotProps is NOT available here
  </template>
</current-user>
Whenever there are multiple slots, use the full <template>based syntax for all slots:
<current-user>
  <template v-slot:default="slotProps">

  </template>

  <template v-slot:other="otherSlotProps">
    ...
  </template>
</current-user>
Destructuring Slot Props
Internally, scoped slots work by wrapping your slot content in a function passed a single argument:
function (slotProps) {
  // ... slot content ...
}
That means the value of v-slot can actually accept any valid JavaScript expression that can appear in the argument position of a function definition. So in supported environments (single-file components or modern browsers), you can also use ES2015 destructuring to pull out specific slot props, like so:
<current-user v-slot="{ user }">

</current-user>
This can make the template much cleaner, especially when the slot provides many props. It also opens other possibilities, such as renaming props, e.g. user to person:
<current-user v-slot="{ user: person }">

</current-user>
You can even define fallbacks, to be used in case a slot prop is undefined:
<current-user v-slot="{ user = { firstName: 'Guest' } }">

</current-user>
Dynamic Slot Names
New in 2.6.0+
Dynamic directive arguments also work on v-slot, allowing the definition of dynamic slot names:
<base-layout>
  <template v-slot:[dynamicSlotName]>
    ...
  </template>
</base-layout>
Named Slots Shorthand
New in 2.6.0+
Similar to v-on and v-bind, v-slot also has a shorthand, replacing everything before the argument (v-slot:) with the special symbol #. For example, v-slot:header can be rewritten as #header:
<base-layout>
  <template #header>
    <h1>Here might be a page title</h1>
  </template>

  <p>A paragraph for the main content.</p>
  <p>And another one.</p>

  <template #footer>
    <p>Here's some contact info</p>
  </template>
</base-layout>
However, just as with other directives, the shorthand is only available when an argument is provided. That means the following syntax is invalid:
<!-- This will trigger a warning -->
<current-user #="{ user }">

</current-user>
Instead, you must always specify the name of the slot if you wish to use the shorthand:
<current-user #default="{ user }">

</current-user>
router路由
基本使用
- 基础路由
- 嵌套路由
- 命名路由
路由的query参数
路由的params参数
路由的props配置
如果不配置路由的 props option, 则在父组件中由 rounter-link标签 向路由传参数(params型 query型)给子组件 使用类似$route.query.id的写法调用
配置路由的props option使路由将参数作为props传给子组件 在子组件配置props option接收传来的props属性 (简化了子组件应用传入参数时的写法)
目的均为实现在父组件中由不同的router-link 传递不同参数到同一组件 展示不同的内容
router-link的replace属性
编程式路由导航
路由守卫
hash模式与history模式
ElementUI
- 基本使用